3D Printing Facts That Change How You Prototype
The 3D printing facts that change decisions: process costs, lead times, material behaviour, and the point where printing stops being the right answer.
February 5, 20168 min read

Written by Ralph Hill, Mechanical & electrical systems, 3D manufacturing
Prototyping Engineer
Published February 5, 2016Updated September 2, 2026
Most 3D printing facts you find online are trivia. These are the ones that change a project schedule or a budget. The technology is older than most people assume, cheaper than most quotes suggest, and weaker in one specific direction that catches teams out when a printed part is used as a functional test article.
Ten facts worth knowing before you print
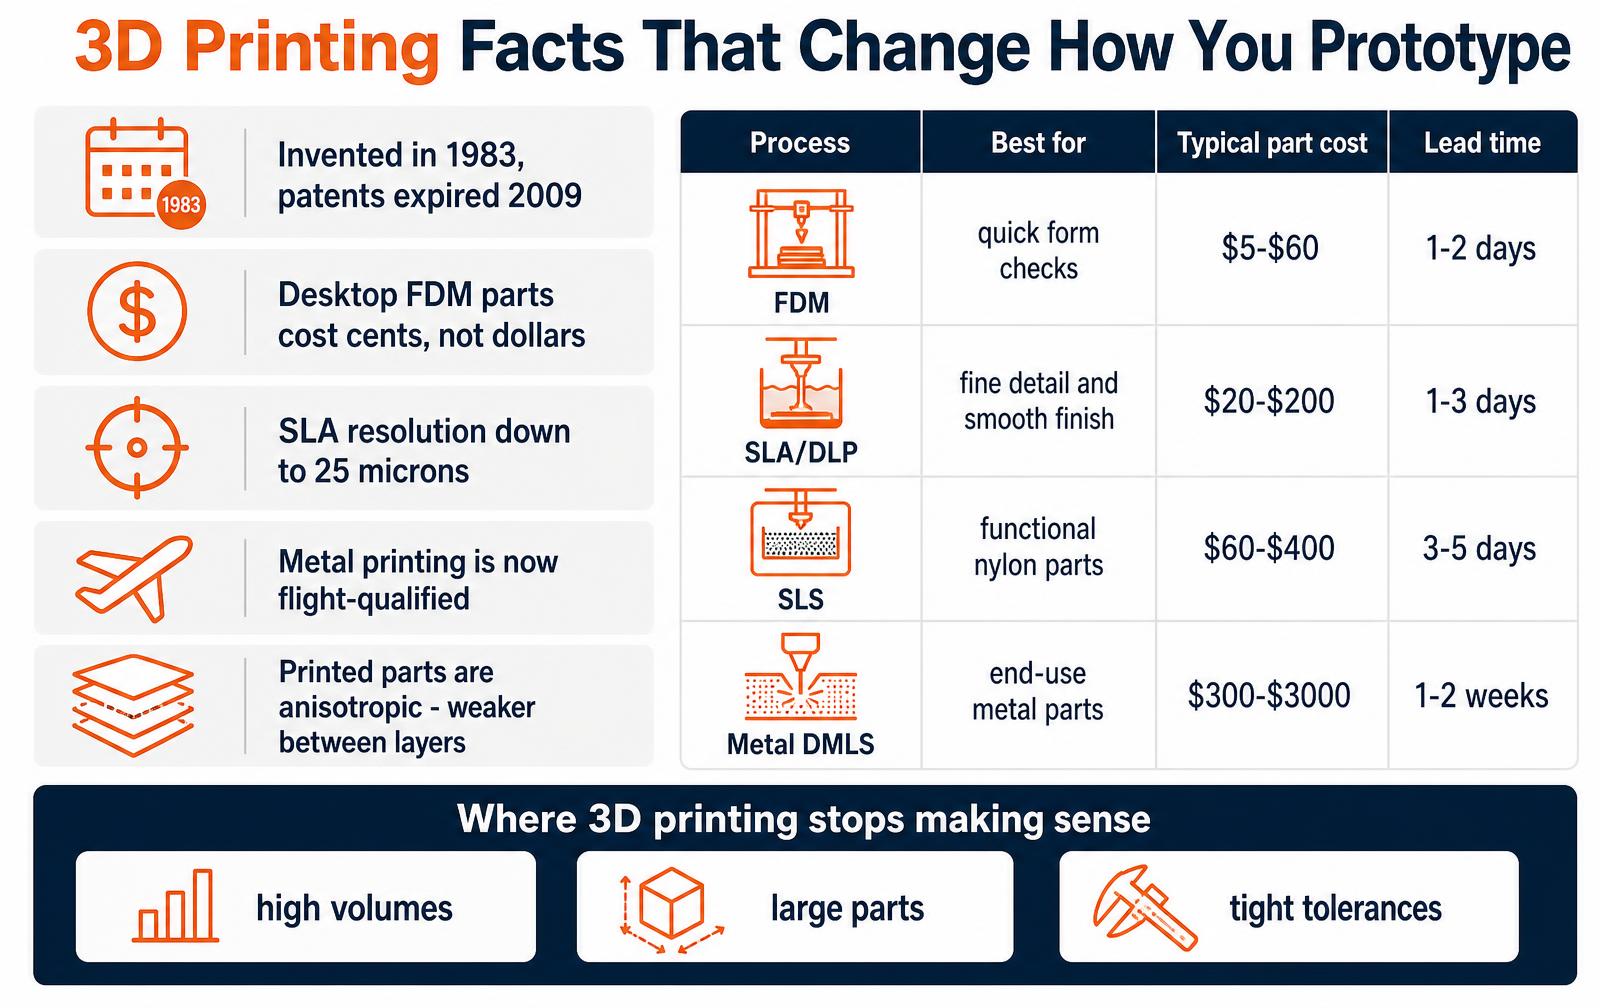
- It was invented in 1983. Chuck Hull built the first stereolithography apparatus decades before desktop printers appeared. The 2009 expiry of the core FDM patents, not a new invention, caused the price collapse.
- Printed parts are anisotropic. Strength between layers can be 30-60% of strength within a layer. Orient the part so the load runs along the layers, or the test result tells you nothing about the moulded version.
- Resolution and accuracy are different numbers. An SLA printer with 25 micron layers still has dimensional accuracy nearer plus or minus 0.1-0.2 mm across a part. Fit checks need measured parts, not spec sheets.
- Material cost is rarely the cost. A palm-sized FDM part uses a dollar of filament. The quote reflects machine time, setup, support removal and finishing.
- Supports drive the price. Redesigning an overhang can cut hours of post-processing. Self-supporting angles of about 45 degrees are the cheapest geometry you can draw.
- Resin parts age. Standard SLA resins keep curing, absorb moisture and get brittle. They are excellent for appearance models and poor for parts that must still fit in six months.
- Metal printing is flight-qualified. Fuel nozzles and structural brackets in production aircraft are printed today, but the process needs stress relief, support removal and machining of critical faces.
- Nylon SLS parts behave like real engineering plastic. No supports, isotropic enough for living hinges and snap fits, which is why functional prototypes usually end up in SLS rather than FDM.
- Tolerances tighter than plus or minus 0.1 mm need machining. Print the body, machine or ream the critical features, and stop fighting the process.
- Volume flips the economics fast. Printing wins below roughly 100-500 units depending on size. Above that, tooling amortises and injection moulding is cheaper per part.
What each process costs and how fast it arrives
Process | Best for | Typical part cost | Lead time | Watch out for |
|---|---|---|---|---|
FDM | Fast form and fit checks | $5-$60 | 1-2 days | Layer adhesion, visible ridges |
SLA / DLP | Fine detail, smooth appearance models | $20-$200 | 1-3 days | Brittleness and UV ageing |
SLS (nylon) | Functional prototypes and small runs | $60-$400 | 3-5 days | Porous surface, needs sealing or dyeing |
MJF | Repeatable functional parts in batches | $50-$350 | 3-6 days | Grey finish, limited materials |
Metal DMLS | End-use metal, complex internal channels | $300-$3,000 | 1-2 weeks | Support removal and post-machining cost |
Those ranges assume a part that fits in two hands and a standard finish. Our prototype cost calculator gives a first estimate for a specific part, and the rapid prototyping service covers the printed, machined and cast options together.
Where 3D printing stops making sense
Situation | Why printing struggles | Better option |
|---|---|---|
Hundreds or thousands of units | Per-part cost never drops | Injection moulding or urethane casting |
Parts larger than the build volume | Bonded sections are weak and visible | Machining, thermoforming, fabrication |
Tolerances under 0.1 mm | Process variation exceeds the requirement | CNC machining, or print then machine |
Optical clarity | Layer lines scatter light even after polishing | Machined and polished acrylic |
Certified end-use load-bearing parts | Qualification of the process is expensive | Conventional manufacturing with known data |
The practical rule: print to learn, machine to measure, mould to ship. Teams that keep printing past the learning stage usually discover the cost problem after they have already promised a launch date. Design for manufacturing is where that transition gets planned.
What each process is actually good for
The interesting facts about 3D printing stop being trivia the moment they change a design decision. The practical version: each process has a geometry it rewards and a geometry it punishes, and knowing which is which is worth more than knowing the history of the technology.
Process | Rewards | Punishes | Typical tolerance |
|---|---|---|---|
FDM | Large, chunky, low-cost parts | Fine detail, thin unsupported walls | ±0.5% (min ±0.5 mm) |
SLA / DLP | Detail, smooth surfaces, small parts | Long-term UV exposure, snap fits | ±0.15% (min ±0.1 mm) |
SLS / MJF | Complex geometry, living hinges, batches | Sealed hollow voids (trapped powder) | ±0.3% (min ±0.3 mm) |
Binder jetting metal | Complex metal parts at quantity | Tight tolerance as-sintered | ±1% after sintering |
DMLS / L-PBF | Load-bearing metal, conformal cooling | Cost, support removal, overhangs | ±0.2 mm typical |
Design rules that prevent reprints
- Keep unsupported overhangs under 45 degrees or design in a chamfer instead of a support structure.
- Give SLS and MJF parts an escape hole of at least 4 mm for trapped powder in any enclosed cavity.
- Orient the part so functional surfaces avoid support contact — supports leave witness marks that no sanding fully hides.
- Remember layer adhesion: FDM parts are typically 30–50% weaker along the Z axis, so orient loads across layers.
- Add 0.2–0.4 mm clearance for press fits and 0.4–0.6 mm for sliding fits; nominal CAD clearances rarely survive printing.
- Thread with heat-set inserts rather than printed threads on any joint that will be opened more than a few times.
Where 3D printing is now a production process
Additive stopped being purely a prototyping technology somewhere around the point where printed end-use parts became routine in hearing aids, dental aligners, jigs and fixtures, and low-volume industrial housings.
The economics work whenever tooling cannot be amortized: under roughly 500 units for many plastic parts, or at any volume where each unit is geometrically different.
Above that crossover, injection molding wins on cost per part and surface quality, which is why bridge production — printing while steel is cut — has become a standard schedule tactic.
Application | Why additive wins | Typical volume |
|---|---|---|
Jigs, fixtures, assembly aids | One-off geometry, same-week turnaround | 1–50 |
Custom-fit medical and dental | Every unit differs by patient | Unlimited |
Low-volume enclosures | Tooling cannot amortize | 10–500 |
Conformal cooling inserts | Impossible to machine conventionally | 1–20 |
Bridge production | Ship while tooling is cut | 50–2,000 |
Costs and limits to plan around
- Post-processing frequently exceeds print cost: support removal, bead blasting, sanding and painting are labor.
- Printed parts are not automatically food safe or biocompatible — the material certificate and the surface finish both matter.
- Resin parts continue curing and can drift dimensionally over weeks in sunlight; do not use them as long-term gauges.
- Flame ratings and UL listings on printed materials are limited; regulated products usually still need molded parts.
We print in-house daily for client programs — see our rapid prototyping services.
Frequently asked questions
What are some interesting facts about 3D printing?
3D printing dates to 1983, and the desktop boom came from patents expiring in 2009 rather than a new invention. Printed parts are anisotropic, meaning they are significantly weaker between layers than within them. Metal printed parts now fly in certified aircraft engines, and nylon SLS parts behave closely enough to moulded plastic to be used as functional prototypes.
How much does a 3D printed prototype cost?
A hand-sized FDM part is typically $5-$60 and arrives in one to two days. An SLA appearance model runs $20-$200, functional nylon SLS parts $60-$400, and metal DMLS parts $300-$3,000 with one to two weeks lead time. Machine time, supports and finishing drive the price far more than the material itself.
When should you stop using 3D printing?
Switch away from printing when volumes pass roughly 100-500 units, when parts exceed the build volume, when tolerances tighter than plus or minus 0.1 mm are required, or when optical clarity or certified structural performance is needed. Injection moulding, urethane casting and CNC machining cover those cases at lower cost or higher confidence.
The facts that actually change how you prototype
Most surprising 3D printing facts are trivia. A few change engineering decisions. The important one is anisotropy: a printed part is typically 30-60% weaker along the build axis than across it, so orientation is a design input, not a print-shop detail.
The second is that printed dimensional accuracy is process-specific and rarely better than plus or minus 0.1-0.3 mm, which means press fits and threads usually need a machining or insert operation afterwards.
The third is economic. Additive manufacturing has no tooling cost and a nearly flat unit cost, while injection molding has a large tooling cost and a very low unit cost. The crossover for a small part typically lands between 500 and 5,000 units. Knowing roughly where your product sits on that curve tells you whether printing is a bridge or a dead end.
Process comparison for functional prototypes
Process | Typical tolerance | Strength vs molded | Cost per part (palm-sized) | Best use |
|---|---|---|---|---|
FDM | +/- 0.3 mm | 40-70% | $8-$40 | Form checks, fixtures, jigs |
SLA / DLP | +/- 0.15 mm | 30-60%, brittle | $15-$70 | Appearance models, fine detail |
SLS (nylon) | +/- 0.25 mm | 80-95% | $25-$120 | Functional parts and living hinges |
MJF | +/- 0.2 mm | 85-95% | $25-$110 | Short-run end-use parts |
Metal DMLS | +/- 0.2 mm | 90-100% | $200-$1,500 | Brackets, manifolds, tooling inserts |
Post-processing is the hidden line item. Support removal, bead blasting, sanding and dyeing routinely add 30-60% to the quoted part price, and metal parts almost always need heat treatment plus machining on mating faces.
Design-for-printing checklist
- Orient load paths across layers, not along them, and state the required orientation on the print order.
- Keep wall thickness at or above 1.0 mm for FDM and 0.8 mm for SLS to avoid warping and blowouts.
- Design self-supporting angles above 45 degrees to cut support removal time.
- Use heat-set inserts instead of printed threads on anything that will be assembled more than twice.
- Add 0.2-0.4 mm clearance on nominally mating features and tune it with a printed fit gauge.
- Print one part in the final material before you commit to a design review - resin prototypes mislead on stiffness.
Key takeaways
- Layer orientation is a structural decision and belongs in the drawing notes.
- Printing wins below roughly 500-5,000 units; past that, tooling pays for itself quickly.
- Budget post-processing at 30-60% of the print quote when you plan a prototype cycle.
Fun facts about 3D printers that still matter on the shop floor
Trivia earns its place when it changes a decision. A desktop FDM machine spends more of its life idle than printing, so shops quote queue time, not print time. A resin printer's build speed depends on layer count rather than part volume, which is why ten small parts on one plate cost barely more than one.
Metal powder is reused across builds under a controlled sieve-and-blend procedure, so a supplier who cannot describe that procedure is guessing at the mechanical properties they quote you.
Material choices behind the ten facts
Material | Process | What it is genuinely good at | Where it fails |
|---|---|---|---|
PLA | FDM | Cheap form studies, fast iteration, dimensional stability while cold | Softens near 60C, brittle under impact |
PETG / ABS | FDM | Functional brackets, enclosures, snap fits | Warping on large flat areas, visible layer lines |
Standard resin | SLA | Appearance models, fine detail, smooth surfaces | Creeps and yellows under UV, poor impact strength |
Tough / engineering resin | SLA | Living hinges, press fits, short-term functional testing | Properties drift with post-cure schedule |
Nylon PA12 | SLS | Durable functional parts, no support structures, complex geometry | Porous surface, absorbs moisture, matte grey only |
Aluminium / stainless | DMLS | Metal brackets, manifolds, heat paths | 10x the cost of polymer, needs stress relief and machining |
The material column is the one to argue about in a review. Process choice usually follows from material once someone states what the part must survive: temperature, load, UV, chemicals, or nothing at all because it is a shelf model.
Choosing a process when the facts conflict
Most real decisions involve two facts pulling in opposite directions: SLS is stronger but slower and costlier, SLA looks better but degrades in sunlight, FDM is cheapest but weakest across layers. The tiebreaker is always the question the part has to answer this week. A part built to check whether a hand fits around a grip does not need nylon. A part going into a two-week field trial does.
- Answering a form or ergonomics question: FDM in PLA, cheapest available, next day.
- Showing the product to a customer or investor: SLA, sanded and painted, budget the finishing time.
- Testing function, load or repeated assembly: SLS nylon or machined plastic, printed in the correct orientation.
- Checking heat, stiffness or a metal interface: DMLS or machined aluminium, not a polymer stand-in.
- Producing 50 to 500 units for a soft launch: urethane casting from a printed master usually beats printing each one.
One more practical fact rarely mentioned in trivia lists: the print itself is often the shortest part of the lead time. Queue, post-processing, finishing and shipping usually account for two-thirds of the calendar. When a supplier quotes two days, ask which two days they mean.
Need prototypes that answer a real question?
We pick the process around what has to be proven next, not around what is fastest to print.
Work with LA NPDT: if you are moving from here to execution, start with our rapid prototyping services or talk to us about prototype design.
Frequently asked questions
Are 3D printed parts strong enough for real testing?
They are strong enough for most functional testing if you respect anisotropy and derate. A printed part is typically 40 to 70 percent as strong across layers as it is along them, and injection-moulded equivalents beat both. For user testing, drop testing and fit checks, printed parts answer the question.
For load-rated claims, certification data or fatigue life, print the geometry to prove the concept and then machine or mould the parts that carry the claim. State print orientation on the order; do not let the shop choose it for packing efficiency.
Derate published tensile numbers by half for load-bearing checks unless you test coupons yourself. Print two of every part you plan to break, so a single bad build does not become a design conclusion. Record machine, material lot and layer height with the test result, or the test is not repeatable.
How many facts about 3D printing actually change a budget?
Three. Post-processing frequently costs more than the print. Layer orientation determines whether a part passes or fails a load test. And per-part cost is flat with volume, which means printing stops being the cheap option somewhere between 100 and 500 units. Everything else is context.
Services related to this guide
- Best prototyping companiesDevelopment firms, instant-quote bureaus and local shops — who fits which job.
- Free prototype cost calculatorFive to eight questions, an instant cost range for a first prototype.
- Prototype development companiesWhich firms take a sketch to a working prototype — and which only fabricate parts.
- Rapid prototypingWorking prototypes in days, from 3D printing to vacuum casting.