How to Reduce Product Design Cost Without Losing Quality
Spending way more than you should on product design because of some hidden loopholes? Check here on how to reduce your design costs
November 27, 20228 min read

Written by Konstantin Dolgan, Ph.D., NPDP
Founder & CEO, Product Development Engineer
Published November 27, 2022Updated September 15, 2026
Most design budget overruns are not caused by expensive engineers. They are caused by rework - decisions revisited, drawings redone, prototypes rebuilt because requirements moved after work started. Cutting hourly rates saves a few percent. Cutting rework saves a third.
This guide shows where product design money actually goes, seven methods that reduce cost with the trade-off stated for each, and the false economies that raise total cost while appearing to lower it. For full-program budgeting, see new product development cost by phase.
Where the money actually goes
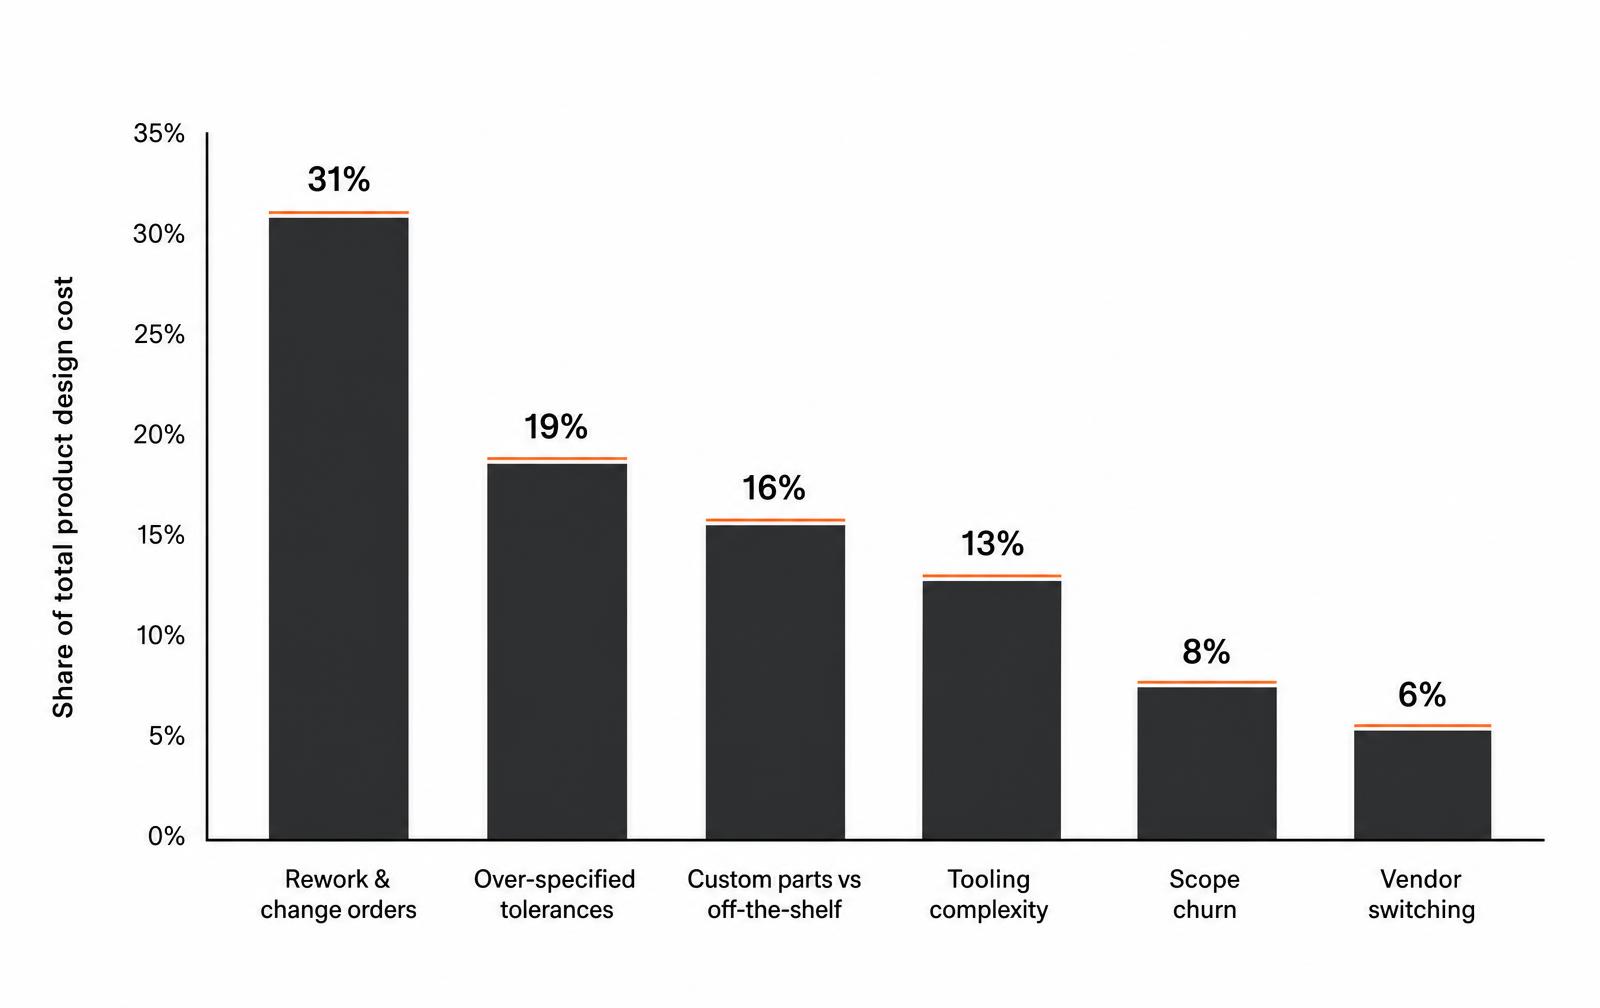
Cost driver | Typical share of design spend | Root cause |
|---|---|---|
Rework and change orders | About a third | Requirements not frozen before detailed design |
Over-specified tolerances and finishes | Roughly a fifth | Defaults copied from a previous project |
Custom parts where standards exist | Roughly a sixth | No parts library or standardization review |
Tooling complexity | Around an eighth | Geometry that forces side actions and multiple cavities |
Scope churn | Under a tenth | Features added mid-phase without a gate |
Vendor switching | Small but disruptive | Sourcing chosen on price after design is locked |
The pattern matters more than the exact percentages: the largest savings come from decisions made before CAD, not from squeezing the people doing CAD.
Seven methods that actually reduce cost
Method | Typical saving | Trade-off to accept |
|---|---|---|
Freeze requirements before detailed design | 15 to 30 percent of design hours | Slower start; a real requirements phase up front |
Use off-the-shelf parts wherever function allows | 10 to 25 percent of BOM and design time | Less differentiation on non-visible components |
Right-size tolerances and surface finishes | 5 to 20 percent of part cost | Requires a tolerance stack-up analysis to do safely |
Batch design changes into scheduled releases | 10 to 20 percent of engineering hours | Non-urgent fixes wait for the next release |
Design for manufacture before quoting | 10 to 30 percent of tooling and unit cost | Manufacturing input is needed early, not at handoff |
Reduce part count through integration | 5 to 15 percent of assembly cost | Higher tooling complexity per part; verify it nets out |
Prototype only to answer defined questions | 20 to 40 percent of prototyping spend | Discipline to skip the impressive-looking build |
1. Freeze requirements before detailed design
Every requirement that changes after detailed design begins invalidates drawings, tolerance analysis, supplier quotes and often tooling direction. Write requirements as measurable statements with a named owner, review them with manufacturing and sales, then hold a freeze gate. Changes after the gate go through a change board with a cost estimate attached, which alone eliminates most of them.
2. Use off-the-shelf parts wherever function allows
A custom fastener, bracket or seal costs design time, drawing time, tooling, qualification and supply risk. A catalog equivalent costs a search. Reserve custom geometry for the parts that carry your differentiation - the ones customers see, touch or benefit from - and standardize everything else. Maintain an approved parts library so the second product reuses the first one work.
3. Right-size tolerances and finishes
Tolerance is the most expensive number on a drawing. Tightening a machined dimension by one order of magnitude can double or triple its cost, and cosmetic finish callouts on hidden surfaces waste money silently. Run a stack-up analysis, tighten only the dimensions that control fit or function, and open everything else to standard shop tolerances.
Two or three critical dimensions per part is normal. A drawing where every dimension is tight signals that nobody did the analysis.
4. Batch changes into scheduled releases
Each individual change carries fixed overhead: drawing update, review, revision control, supplier notification, sometimes re-quoting. Ten changes released together cost far less than ten released separately. Keep a running change list, triage weekly, and release on a cadence unless a change blocks a build.
5. Bring manufacturing in before the design is finished
A design for manufacture review at 60 to 80 percent completion typically finds changes that reduce tooling and unit cost by double digits - draft angles, uniform wall thickness, eliminated undercuts, consolidated finishes, better material selection. The same findings after tooling release cost a tool modification instead of a CAD edit. See our manufacturing services for how this review runs in practice.
6. Reduce part count - but verify it nets out
Fewer parts means fewer drawings, fewer suppliers, fewer assembly steps and fewer tolerance interactions. Integration is not always cheaper though: combining three simple molded parts into one complex part with side actions can raise tooling cost more than it saves in assembly. Compare total cost at your real volume before committing.
7. Prototype only to answer defined questions
Every prototype should have a written question and pass criteria. Builds made to look impressive rather than to retire a risk are the most common avoidable line item in a design budget. Match fidelity to the question - see prototyping done right and what prototypes cost.
False economies that raise total cost
Apparent saving | What it actually costs |
|---|---|
Skipping the requirements phase | Rework that exceeds the phase you skipped, usually several times over |
Choosing the lowest hourly rate | More hours, more revisions, weaker manufacturing judgment |
Skipping prototypes to save time | Defects discovered in tooling or in the field |
Deferring DFM to the manufacturer | Tool modifications and unit cost locked in by geometry |
Cutting testing and validation | Warranty claims, recalls and lost retail relationships |
Splitting work across cheap disconnected vendors | Integration failures nobody owns |
A practical sequence for a cost-constrained program
- Write measurable requirements and hold a freeze gate before detailed design.
- Set a target unit cost at a stated volume and track the BOM against it weekly.
- Run a standardization pass: which parts can be catalog items?
- Do a DFM review at 60 to 80 percent design completion with a real manufacturer.
- Analyze tolerance stacks and open every dimension that does not control fit or function.
- Plan prototype rounds by the risk each retires, and no more.
- Batch changes on a weekly release cadence with cost attached to each.
Frequently asked questions
How can I reduce product design costs?
Freeze requirements before detailed design, use off-the-shelf parts where function allows, right-size tolerances after a stack-up analysis, batch changes into scheduled releases, run a design for manufacture review before tooling, consolidate parts where it nets out, and prototype only to answer defined questions. Together these commonly cut design spend by 20 to 40 percent.
What is the biggest driver of product design cost?
Rework caused by late requirement changes. It typically consumes about a third of design spend because each change invalidates drawings, tolerance analysis, supplier quotes and sometimes tooling direction. A requirements freeze gate with costed change control is the highest-leverage fix.
Does cutting design cost hurt product quality?
Not when the savings come from eliminating rework, over-specification and unnecessary custom parts - those changes usually improve manufacturability. Quality suffers when teams cut validation testing, skip prototypes or defer design for manufacture, because those defects surface in tooling or in the field where they cost far more.
How much does tightening a tolerance cost?
Cost rises sharply and non-linearly. Moving a machined feature from a standard shop tolerance to a precision one can double or triple that feature cost through slower machining, added inspection and higher scrap. Most parts need only two or three tightly controlled dimensions.
Is it cheaper to use one design firm or several specialists?
One integrated team is usually cheaper in total for hardware programs. Splitting industrial design, mechanical engineering, electronics and manufacturing across disconnected vendors creates integration gaps that nobody owns, and the rework at those boundaries typically exceeds the rate savings.
Design it once, correctly
LA NPDT scopes programs around the decisions that control cost - requirements, standardization, tolerances and manufacturability - through product design, mechanical engineering and manufacturing support.
Where cost is locked in versus where it is spent
The uncomfortable arithmetic of product design cost is that early decisions commit most of the lifetime cost while consuming very little of the budget. By the time a program is in tooling, the levers that remain are small. Understanding that curve is what makes cost reduction a scheduling decision rather than a negotiation with suppliers.
Cost committed by phase
Phase | Share of budget spent | Share of lifetime cost committed | Levers still available |
|---|---|---|---|
Concept | 5-10% | 60-70% | Architecture, part count, technology choice |
Detailed design | 25-35% | 80-85% | Materials, tolerances, process selection |
Prototyping and test | 15-25% | 90% | Design refinements, supplier choice |
Tooling and transfer | 30-40% | 95%+ | Cycle time, cavitation, packaging |
Production | Ongoing | Locked | Negotiation, yield improvement only |
This is why a cost workshop at concept, with a manufacturing engineer present, returns more than months of later supplier negotiation. Spend a week there and the remaining program has a realistic target instead of an aspiration.
Concept-phase cost workshop agenda
- Set a target BOM cost and a target landed cost before drawing anything.
- Review the architecture for part count and assembly steps.
- Choose processes deliberately against volume, not by habit.
- Identify the three most expensive parts and challenge each requirement behind them.
- Agree what quality attributes are non-negotiable so later cuts do not touch them.
Key takeaways
- Concept decisions commit most of the lifetime cost while spending almost none of it.
- A cost workshop at concept beats supplier negotiation later.
- Define non-negotiable quality attributes up front so cost cuts stay safe.
What product design cost looks like by product type
Budgets go wrong most often at the estimate, not during execution. The ranges below are what a competent team charges to take a product from validated concept to a documented, manufacturable design — industrial design, engineering, prototypes and manufacturing documentation included, tooling excluded.
Product type | Typical design cost | Main cost driver | Common overrun |
|---|---|---|---|
Simple moulded consumer product | $15,000-$45,000 | Part count and cosmetic finish | Late aesthetic changes after tooling quote |
Mechanical product with moving parts | $35,000-$90,000 | Tolerance stack and durability testing | Wear failures found in late testing |
Connected electronics device | $60,000-$180,000 | Firmware, RF performance, certification | Pre-compliance failures and antenna retuning |
Medical or regulated device | $120,000-$400,000 | Design controls, documentation, verification | Documentation written after the fact |
Industrial equipment | $80,000-$250,000 | Safety standards and low-volume fabrication | Vendor drawing revisions and site variations |
Two rules travel across every row. A quote without a named prototype count is not a quote. And any estimate that excludes at least one full design-for-manufacture iteration will be exceeded, because that iteration always happens — it is only ever a question of who pays for it.
Tracking cost without adding overhead
- Track spend against phase gates, not against calendar months.
- Log every change request with its cause; recurring causes are process problems, not bad luck.
- Re-estimate the remaining work at each gate rather than defending the original number.
- Keep a target BOM cost on the same page as the design budget; they trade against each other.
- Review prototype spend monthly and kill builds that have no written question to answer.
Cost-effective product development without cutting quality
Cost-efficient product development comes from removing waste, not from removing engineering. The waste is concentrated in three places: work done twice because a requirement moved, features designed but never validated by a user, and custom parts made where a catalogue part would have done the job.
Programs that attack those three routinely finish 20 to 30 percent under a comparable program without any measurable quality loss, because nothing that touches performance was removed.
What does hurt quality is compressing verification. Cutting the test plan saves a few thousand dollars during design and costs a recall, a field retrofit or a returns spike later. Protect testing and standardisation; cut custom parts, speculative features and unnecessary prototype builds instead.
How do you design products to minimize costs?
Set a target cost before drawing, freeze requirements before detailed design, standardise on catalogue components and existing suppliers, keep tight tolerances to the two or three dimensions that need them, and bring a manufacturing engineer into the concept review. Those five habits control most of the lifetime cost while spending almost none of the budget.
Key takeaways on reducing product design cost
- Estimate by product type and always include one design-for-manufacture iteration.
- Rework, over-specification and custom parts are where the money leaks.
- Re-estimate at each gate rather than defending the original number.
- Never buy savings from the verification plan; that cost reappears in the field.
Where the budget goes, phase by phase
Knowing the total is less useful than knowing the shape. On a typical hardware program, the spend is back-loaded while the decisions are front-loaded, which is exactly why cutting the early phases to save money reliably increases the total.
Phase | Share of design budget | What you are buying | What overspending here usually means |
|---|---|---|---|
Requirements and research | 5-10% | A written, testable definition of done | Nothing — this is the cheapest place to spend |
Concept and industrial design | 15-25% | Form, user interaction, initial cost target | Too many concepts explored without a selection rule |
Engineering and detailed design | 30-40% | Drawings, tolerance analysis, BOM | Requirements were never frozen |
Prototyping and testing | 15-25% | Evidence the design works | Builds made without a written question to answer |
Manufacturing documentation | 10-15% | A package a supplier can build from | Documentation done twice because the design moved |
Read those shares against your own invoices. Engineering above 45 percent almost always signals rework. Prototyping above 30 percent signals builds that were not answering defined questions. And a requirements line near zero predicts both of the above later in the program.
The teams that hit their number are rarely the ones with the cheapest hourly rate. They are the ones who decided what the product had to do before anyone opened CAD, and who priced the whole path rather than the next invoice.
Fixed price or hourly: which contract costs less
The contract shape changes the total as much as the hourly rate does. Fixed price moves risk to the design firm, and the firm prices that risk in — typically 15 to 30 percent above the honest estimate — then defends the scope line by line when anything changes. Hourly keeps the premium out of the number but leaves the overrun risk with you.
- Use fixed price where scope is genuinely knowable: a defined redesign, a documentation package, a tooling release.
- Use hourly or phase-capped work for research, concept exploration and troubleshooting, where the scope is the unknown.
- Split the program: fixed price per phase, re-quoted at each gate, is usually the cheapest honest structure.
- Insist on a named prototype count and a named change allowance in either structure; both are where quotes hide.
- Ask what happens when a test fails. A contract with no answer to that question will produce a change order.
Whatever the structure, review spend against phase gates and re-forecast the remainder at each one. A budget that is only compared with its original number at the end tells you nothing while it still could have been fixed.
Need to hit a cost target without losing quality?
Work with LA NPDT: if you are moving from here to execution, start with our product design services or talk to us about industrial design and development.
Filed under:EducationInspirationWords
Services related to this guide
- Free prototype cost calculatorFive to eight questions, an instant cost range for a first prototype.
- Prototype designLooks-like, works-like or pre-production: what each proves and what it costs.
- Rapid prototypingWorking prototypes in days, from 3D printing to vacuum casting.
- Best product development companiesHow the leading US firms compare, and which one fits your stage and budget.