Sheet Metal Design Guidelines: Bends, Tolerances and Costs
Sheet metal design guidelines for prototype and low-volume parts: bend radii, reliefs, hole spacing, tolerances, finishes and cost drivers.
May 1, 20248 min read

Written by Ralph Hill, Mechanical & electrical systems, 3D manufacturing
Prototyping Engineer
Published May 1, 2024Updated September 2, 2026
Sheet metal is the fastest way to get a strong, production-representative enclosure or bracket. No tooling, a handful of days of lead time, and parts that behave like the real thing under load and heat. The catch is that quotes swing wildly on details most CAD models get wrong - bend radii, hole-to-bend distance and unnecessary tolerances.
Choosing a material
Material | Typical gauge | Why choose it | Relative cost |
|---|---|---|---|
Cold rolled steel | 0.8-3 mm | Cheapest, strong, needs paint or plating | 1.0x |
5052 aluminium | 1.0-3 mm | Light, bends well, corrosion resistant | 1.4x |
6061 aluminium | 1.5-6 mm | Stiffer and machinable, cracks on tight bends | 1.6x |
304 stainless | 0.8-3 mm | Corrosion and food-safe, higher bend force | 2.2x |
Galvanized steel | 0.8-2 mm | Outdoor brackets, avoid welding fumes | 1.1x |
Design rules that keep quotes low
- Bend radius at least equal to material thickness - tighter radii crack aluminium and need special tooling.
- Holes at least 2.5x thickness from a bend or they deform into ovals.
- Minimum flange length of about 4x thickness so the press brake can grip the part.
- One material and one thickness per part - mixing gauges means multiple setups.
- Uniform bend radii across the part so the shop uses one punch instead of three.
- Reserve tight tolerances for the two features that matter; blanket +/-0.1 mm callouts triple the price.
- Add relief cuts at bend intersections to prevent tearing.
What sheet metal prototypes cost
Part type | Operations | Qty 1-5 unit cost | Lead time |
|---|---|---|---|
Flat bracket | Laser cut only | $25-$70 | 3-5 days |
Bent bracket | Cut plus 2-4 bends | $45-$140 | 4-7 days |
Enclosure panel set | Cut, bend, hardware inserts | $150-$450 | 5-10 days |
Welded chassis | Cut, bend, TIG weld, powder coat | $400-$1,500 | 10-15 days |
When not to use sheet metal
If the part needs organic surfaces, integrated snap features or thick sections, sheet metal fights you - use 3D printing or machining instead. If you expect tens of thousands of units of a complex housing, prototype in sheet metal to prove fit and function, then move to molded or die-cast production once the geometry is frozen.
What to send a shop
- A STEP file of the folded part plus a DXF flat pattern.
- A drawing calling out material, gauge, finish and only the critical dimensions.
- Hardware callouts by part number for press-fit nuts and standoffs.
- Quantity, target date and whether the parts are for fit check or functional testing.
Sheet metal design rules of thumb
Feature | Rule | Why it matters |
|---|---|---|
Minimum bend radius | 1x material thickness (0.5x for soft aluminum) | Tighter radii crack the outer fiber |
Hole to bend distance | 2.5x thickness plus bend radius | Closer holes deform into ovals |
Minimum flange length | 4x thickness | Shorter flanges cannot be gripped by the brake |
Bend relief | 1x thickness wide, deeper than the radius | Prevents tearing at the bend corner |
Tolerance on bent features | +/-0.25 mm typical, +/-0.13 mm with fixturing | Stack-ups grow fast across multiple bends |
Hardware | Self-clinching nuts over tapped sheet | Tapping thin sheet gives you two usable threads |
Cost levers on a sheet metal part
- Use one material thickness across the assembly. Mixed gauges mean multiple setups and more scrap.
- Keep every bend on the same axis where possible. Each additional brake setup adds labor.
- Standardize hole sizes to stock punch tooling. Odd diameters push the job to laser or drilling.
- Nest for material yield. Ask the shop to show the nest before you finalize the outline.
- Avoid cosmetic requirements on non-visible faces. Grain direction and finish specs multiply cost.
- Consider weld versus fastener honestly. Welding adds fixtures and distortion; fasteners add assembly time.
Choosing the alloy and gauge
Material selection in sheet metal is mostly a formability and cost conversation. Cold rolled steel is cheap, forms predictably and needs a finish to resist corrosion. Galvanized steel solves corrosion but the coating can flake at tight bends and complicates welding.
Aluminum 5052 is the workhorse for formed parts because it bends without cracking; aluminum 6061 is stronger but far less forgiving and will crack at radii that 5052 handles easily. Stainless 304 covers hygiene and corrosion requirements at a substantial cost and tool-wear penalty.
Gauge choice deserves the same discipline. Designers often specify a heavier gauge for stiffness when a formed rib, a hem or a flange would add more rigidity for less material and less weight. Stiffness comes from geometry far more than thickness, and a 1.5 mm part with a well-placed rib routinely outperforms a flat 2 mm part while costing less to ship.
Finally, check stock availability before finalizing. Shops carry standard gauges, and specifying a thickness that is not in inventory means a mill order, a minimum quantity and a delay that has nothing to do with your design.
Prototype versus production sheet metal
Prototype sheet metal is cut on a laser and bent on a press brake, one part at a time. Production sheet metal, at volume, is punched or stamped with tooling. The two processes have different design rules, and a part optimized for one can be awkward in the other.
Laser cutting is indifferent to hole size and shape; punching prefers standard tooling and dislikes cutouts smaller than the material thickness. Press brakes need clearance for the tooling and an operator's hands; progressive dies need carrier strips and a strip layout that your geometry has to permit.
The practical approach is to design for the production process from the beginning and accept slightly higher prototype cost, rather than the reverse. Prototypes that are cheap because they ignore die constraints teach you nothing about the part you will eventually make, and the redesign lands exactly when the schedule has no room for it.
Ask your shop early whether your volumes justify tooling at all. Many products never leave laser and brake economics, and paying for a die you do not need is a common way to spend forty thousand dollars for a saving that never arrives.
- Under 500 parts per year: laser and press brake, no tooling.
- 500 to 5,000: laser plus hard tooling for repeated bends or a turret punch program.
- Above 5,000: progressive die becomes credible; model tooling amortization against piece price.
- Any volume: keep bends on common tooling radii so the shop is not changing setups for one feature.
We prototype and produce metal parts through rapid prototyping, transition them with short-run manufacturing, and deliver the drawing package through our CAD and drafting services so the shop is quoting from fully dimensioned prints.
Finishing and hardware decisions
Finish is chosen last and constrains everything. Powder coat is durable and hides minor surface defects but adds roughly 0.05 to 0.1 mm of thickness, which matters on close-fitting parts and threaded holes; mask what must stay conductive or dimensional.
Anodizing on aluminum is thin and precise but shows every scratch from handling and varies in color across lots. Plating adds corrosion resistance and cost, and it requires drainage features on enclosed geometry.
For hardware, self-clinching fasteners installed before finishing are almost always better than tapping thin sheet, which yields too few threads to be reliable. Specify the fastener by manufacturer part number, note whether it is installed before or after finishing, and confirm the minimum sheet thickness the fastener requires. These three lines on a drawing prevent the most common assembly complaint a shop will ever send back to you.
Working with the shop
Sheet metal shops quote from flat patterns, so send a native model plus a STEP file and a dimensioned drawing that states material, gauge, finish, hardware, bend radii and which dimensions are critical. If you leave the bend deduction to the shop, say so explicitly; every brake has its own K-factor and a part unfolded with the wrong assumption comes back the right shape and the wrong size.
Ask for a design review before the first cut. A ten-minute conversation with the person who will bend the part typically saves a full iteration, because they can see immediately that a flange collides with the tooling or a hole sits too close to a bend. Shops give this away free and most customers never ask. Also ask what they would change to cut the price by ten percent; the answer is usually one feature you did not care about anyway.
Frequently asked questions
What is sheet metal prototyping?
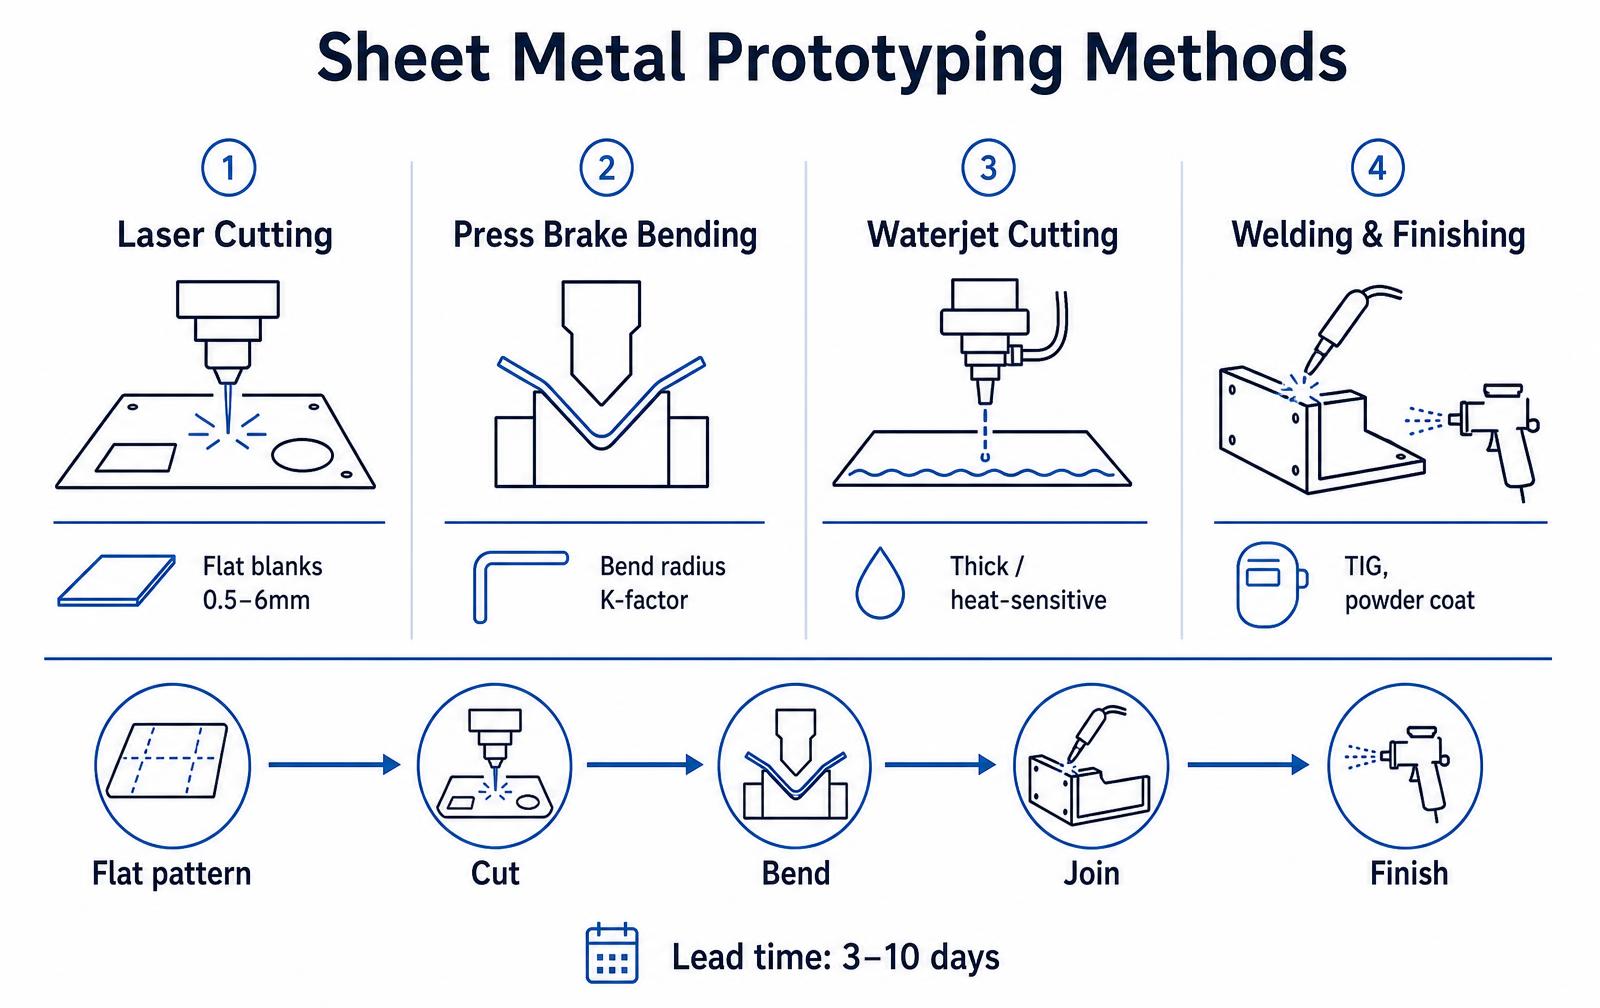
Sheet metal prototyping is making low-quantity metal parts by laser or waterjet cutting a flat blank, bending it on a press brake and optionally welding and finishing it, with no tooling required.
How much does a sheet metal prototype cost?
A simple flat bracket runs $25 to $70, a bent bracket $45 to $140, an enclosure panel set $150 to $450, and a welded and powder coated chassis $400 to $1,500 at quantities of one to five.
How long does sheet metal prototyping take?
Three to ten days for cut and bent parts, and ten to fifteen days when welding and powder coating are involved.
What is the minimum bend radius for sheet metal?
As a rule of thumb use an inside bend radius at least equal to material thickness; softer aluminium alloys and steel tolerate this, while 6061 aluminium often needs 1.5 to 2 times thickness to avoid cracking.
Joining and assembly decisions in sheet metal parts
Sheet metal design guidelines usually cover bends and reliefs, but the joining method often has a larger effect on cost and serviceability. Choosing between welding, hardware and fastened assembly early prevents redesign when the shop quotes the part.
Joining method comparison
Method | Strength | Serviceable | Cost impact | Notes |
|---|---|---|---|---|
Spot welding | High | No | Low at volume | Needs flange access |
MIG/TIG welding | Highest | No | High labor | Distortion risk on thin gauge |
Self-clinching hardware | Good | Yes | Low | Standard PEM inserts |
Rivets | Good | No | Low | Fast, permanent |
Tabs and slots | Moderate | No | Very low | Aids alignment during weld |
Screws into extruded holes | Moderate | Yes | Low | Limited re-use cycles |
Adhesive bonding | Varies | No | Medium | Surface prep critical |
Add tabs and slots even when welding. They locate parts without a fixture, which removes setup cost and makes the assembly repeatable between shops — a meaningful advantage if you ever need to move production.
Sheet metal assembly checklist
- Choose the joining method before finalizing flange geometry.
- Use tabs and slots for self-fixturing alignment.
- Specify hardware by standard part number, not description.
- Confirm tool access for welding or riveting on every joint.
- Decide which joints must be serviceable before release.
Key takeaways
- Joining method drives sheet metal cost as much as bends do.
- Tabs and slots remove fixture cost and improve repeatability.
- Decide serviceable joints before releasing the design.
Sheet metal mistakes that show up as a quote revision
Most sheet metal design guidelines are learned the expensive way: a quote comes back higher than expected, or the shop sends an email asking whether a feature is really required. The five errors below account for most of that traffic, and each has a fix that costs nothing at the CAD stage.
Mistake | What the shop has to do | Cost effect | Fix in CAD |
|---|---|---|---|
Hole placed too close to a bend | Add a secondary operation or accept distortion | Plus 15 to 30% and a tolerance argument | Keep holes at least 2.5x thickness plus bend radius from the bend line |
Missing bend relief | Tearing at the corner or a hand-finished repair | Scrap and rework | Add relief at least 1x thickness wide and deeper than the radius |
Mixed gauges in one assembly | Separate setups and material orders | One extra setup charge per gauge | Standardize on one thickness where stiffness allows |
Bends on all four sides of a shallow pan | Tooling interference on the press brake | Sometimes not quotable at all | Split into two parts, or open one side and add a tab |
Tolerances tighter than 0.25 mm across a bend | Fixtures and inspection | Plus 20% and longer lead time | Tolerance the flat pattern, not the folded envelope |
The pattern behind all five is the same: the press brake is a two-dimensional machine being asked to make a three-dimensional part, and every feature that fights that sequence is paid for twice — once in setup and once in inspection.
Design review questions before release
- Can the part be unfolded to a flat pattern without overlapping geometry?
- Is every bend reachable in sequence without the tooling hitting an earlier flange?
- Does each critical dimension reference a single face, so stack-up does not accumulate across bends?
- Are all threaded features achievable with hardware the shop already stocks, such as PEM inserts or weld nuts?
- Has the finish been chosen, and does it change any hole size or mating clearance?
More sheet metal questions we get asked
Frequently asked questions
How tight can sheet metal tolerances be?
Plan on plus or minus 0.13 mm on laser-cut flat features and plus or minus 0.25 mm on any dimension that crosses a bend. Tighter is achievable with fixtures and inspection, but it adds cost and lead time. Tolerance the flat pattern wherever the function allows, and reserve tight callouts for the two or three features that actually mate with something.
Should a prototype use the production alloy?
Yes, if the prototype is being tested for strength, fatigue or corrosion, because formability and yield differ meaningfully between alloys. For a pure fit check, any similar gauge in a stocked material is fine and often faster.
Say which case applies when you send the request — a good shop will substitute intelligently once it knows what the part has to prove. Work with LA NPDT: if you are moving from here to execution, start with our rapid prototyping services or talk to us about prototype design .
Filed under:3DEducationInspiration
Services related to this guide
- Best prototyping companiesDevelopment firms, instant-quote bureaus and local shops — who fits which job.
- Free prototype cost calculatorFive to eight questions, an instant cost range for a first prototype.
- Prototype development companiesWhich firms take a sketch to a working prototype — and which only fabricate parts.
- Rapid prototypingWorking prototypes in days, from 3D printing to vacuum casting.