The Maker Movement: From Bench Project to Real Product
The maker movement made prototyping cheap and put fabrication on desktops. Turning a maker project into a manufacturable product is a different discipline — here is what changes and where projects stall.
January 20, 20166 min read

Written by Konstantin Dolgan, Ph.D., NPDP
Founder & CEO, Product Development Engineer
Published January 20, 2016Updated September 2, 2026
The maker movement is the culture of building physical things with accessible tools — desktop 3D printers, small CNC machines, open-source electronics and shared makerspaces — and it permanently lowered the cost of the first working prototype. What it did not lower is the cost of the hundredth unit, and that gap is where most maker projects stop being projects and either become products or quietly end.
What actually changed
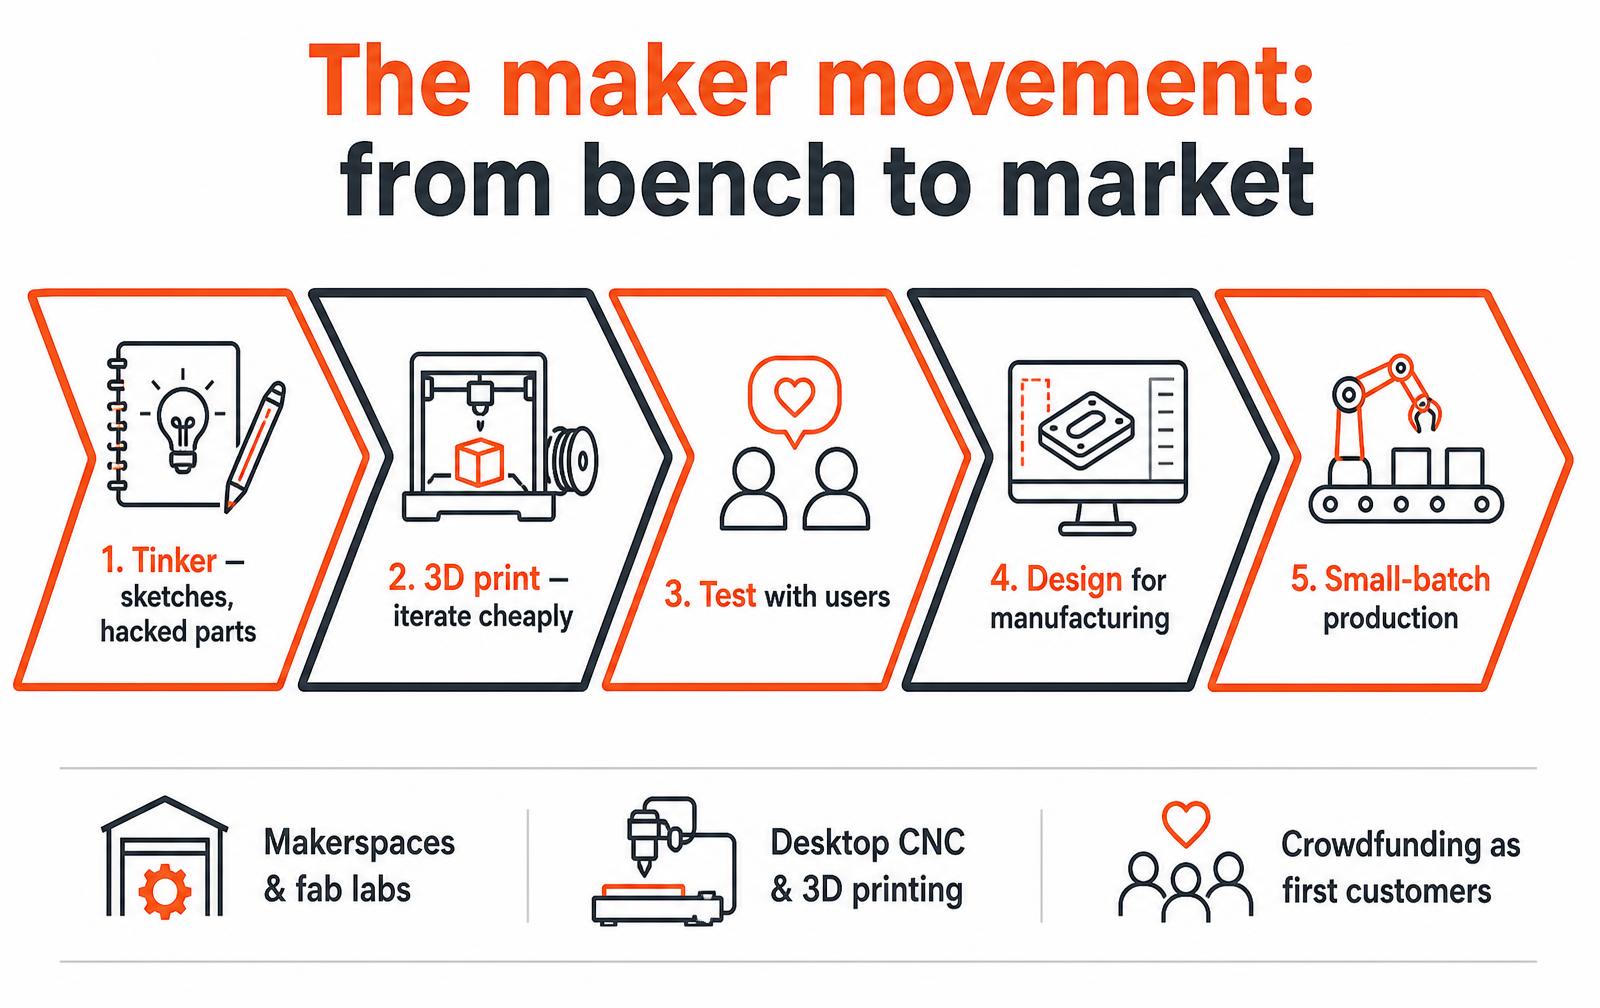
Three shifts arrived together. Fabrication tools that used to require a machine shop landed on desks and in shared spaces. Open-source hardware and software meant a working control board and firmware were a weekend rather than a funded project.
And crowdfunding gave an unknown builder a way to find the first hundred customers before spending money on tooling. Together they turned hardware from a capital-intensive discipline into something a small team could attempt.
The consequence is not that everyone can now manufacture. It is that the risky, uncertain part of product development moved earlier and got cheaper: you can find out that the idea is wrong for a few hundred dollars instead of a few hundred thousand. That is the real gift of the maker movement, and it is worth using deliberately rather than by accident.
Maker build versus production build
Dimension | Maker prototype | Production product |
|---|---|---|
Goal | Prove it can work once | Work every time, in every unit |
Process | 3D printing, hand assembly, hacked parts | Injection molding, sheet metal, fixtured assembly |
Tolerances | Fit adjusted by hand until it works | Specified, with stack-up analysis |
Cost driver | Your time | Unit cost, tooling amortization, yield |
Documentation | Notes and the file on your laptop | Drawings, BOM, revision control, test procedure |
Compliance | Not considered | Safety, EMC and market certifications as required |
None of the right-hand column is bureaucracy. Each item exists because someone else has to make your product without you standing there adjusting it, and because a buyer who receives unit 400 expects it to behave like unit 4.
Where maker projects stall
- Designing for the printer, not the process. Geometry that a 3D printer handles happily — no draft, thick solid walls, undercuts everywhere — is often impossible to mold. Choose the production process before you finish the CAD.
- Hand-fitting the fit. A prototype that only works because you sanded one edge has no tolerance budget. Production needs dimensions with limits, not a feel.
- Off-the-shelf parts with no supply. A hobby module bought in ones may have no lifecycle guarantee, no datasheet worth trusting and no availability at volume.
- Skipping compliance until the end. Certification requirements shape the enclosure, the power supply and the labeling. Discovering them after tooling is the most expensive way to learn.
- Crowdfunding before costing. A campaign priced from prototype intuition rather than a quoted bill of materials, tooling, packaging, freight and fulfillment is a promise to lose money on every unit.
The crossing: what to do in what order
- 1. Freeze the requirement, not the design. Write what the product must do, for whom, at what price and in what environment. Everything downstream is negotiable against this document.
- 2. Put it in real hands. Ten users with the current prototype will change more of the design than a month of solo refinement.
- 3. Choose the process and volume. Hundreds per year and tens of thousands per year lead to different materials, different tooling and different partners. Decide before detailed design.
- 4. Redesign for manufacturing. Draft angles, wall thickness, part consolidation, fastener strategy, assembly sequence, serviceability.
- 5. Cost it properly. Quoted BOM, tooling, assembly labor, test, packaging, freight, duty, fulfillment, returns and margin — before you set a price.
- 6. Build a pilot run. A small batch off production-intent tooling finds the problems that no amount of CAD review will.
This is the same sequence a professional program follows; the maker advantage is that steps one through three cost you almost nothing. Teams that use makerspace economics to compress discovery and then bring in design for manufacturing discipline at step four are the ones that reach shelves.
Why this still matters
Maker culture keeps producing people who are unafraid of physical things, and that is now a hiring advantage, an education strategy and a reshoring argument at the same time. A country that tinkers builds a workforce that can prototype, repair and manufacture. Every hardware program we work on goes better when someone on the team has personally cut, printed or soldered the thing being discussed.
What a working shop actually costs
Maker tooling has collapsed in price to the point that a capable prototyping bench costs less than a single mold used to. That changes who can start, but it does not change what production requires - the gap between the two columns below is where most projects stall.
Capability | Entry setup | Serious setup | What it unlocks |
|---|---|---|---|
Additive manufacturing | $300-$800 FDM printer | $3,000-$8,000 resin or industrial FDM | Form and fit models, jigs, low-volume parts |
Electronics prototyping | $200 iron, meter and dev boards | $3,000-$10,000 scope, hot air, analyzer | Functional circuits and debug |
CAD and simulation | Free or $300 per year hobby licenses | $2,000-$8,000 per year commercial seats | Manufacturable drawings and released files |
Subtractive machining | $1,500 desktop CNC | $25,000+ tool-room mill | Metal parts, tooling, fixtures |
Measurement | $50 calipers | $5,000+ height gauge and gauge blocks | Tolerance verification that a supplier respects |
Test and validation | Improvised rigs | $10,000+ environmental and life-cycle rigs | Evidence a product will survive its use |
Skills the transition demands
- Reading a tolerance stack. A part that fits your printed prototype may not fit across a molder tolerance band.
- Writing a specification. Suppliers quote documents, not intentions; an undocumented requirement is a requirement you paid for twice.
- Costing a bill of materials. Knowing the landed cost per unit at 1,000 and at 10,000 changes every design decision.
- Selecting a process. Printing, casting, molding and machining each have a volume band where they win; committing early to the wrong one is expensive.
- Planning compliance. Certification requirements shape enclosure design, spacing and materials before the design is frozen.
- Managing suppliers. Clear drawings, defined acceptance criteria and first-article inspection prevent most quality disputes.
A realistic first-product sequence
Stage | Objective | Typical duration | Typical spend |
|---|---|---|---|
Bench prototype | Prove the mechanism works once | 2-8 weeks | $500-$5,000 |
Design for manufacture | Convert the concept into a producible design | 4-10 weeks | $15,000-$80,000 |
Engineering prototype | Production materials and processes | 4-8 weeks | $5,000-$30,000 |
Compliance testing | Pass the standards that apply | 4-10 weeks | $5,000-$50,000 |
Tooling and pilot run | Tools cut, first articles approved | 8-14 weeks | $10,000-$120,000 |
Production | Repeatable output at target yield | Ongoing | Unit cost times volume |
Key takeaways
- Accessible tools removed the cost of trying; they did not remove the cost of manufacturing.
- The maker advantage is speed through the uncertain early stages, where iteration is cheap.
- Freeze requirements rather than designs, and choose the production process before detailing parts.
- Budget the design-for-manufacture stage explicitly - it is the step most bench projects skip and most failures trace to.
Legal and liability steps before selling a maker product
The maker movement made building easy and left selling largely unchanged. The moment money changes hands, a project becomes a product with the obligations that implies: safety, labeling, liability and an entity to hold it all. These steps are inexpensive relative to the risk of skipping them.
Steps before the first sale
Step | Why | Typical cost |
|---|---|---|
Form a legal entity | Separates personal and business liability | $100-$800 |
Product liability insurance | Required by most retailers and marketplaces | $500-$3,000 per year |
Safety testing for the category | Legal requirement for many products | $500-$5,000 |
Required labeling and marking | Country of origin, warnings, certifications | Design time only |
Written warranty and returns terms | Sets expectations, limits exposure | Legal review cost |
Trademark search and filing | Protects the name you are building | $1,000-$2,500 |
Children's products, anything electrical, anything that contacts food or skin, and anything with a battery carry heavier requirements than a typical maker project assumes. Check the category rules before you list, not after a marketplace pulls the listing.
First-sale readiness checklist
- Confirm which safety standards apply to your specific category.
- Get liability insurance before listing anywhere.
- Put required markings on the product and the packaging.
- Write clear warranty and returns terms.
- Keep records of materials, suppliers and test results per batch.
Key takeaways
- Selling turns a project into a product with legal obligations.
- Entity, insurance and category testing come before the first listing.
- Batteries, children's items and skin or food contact carry extra rules.
From the archive
Ready to turn a maker project into a real product?
Work with LA NPDT: if you are moving from here to execution, start with our product discovery for inventors or talk to us about prior art search.
Sources and standards
- USPTO — patent basics — Official filing guidance from the US Patent and Trademark Office.
- WIPO PCT system — International patent filing route for products sold abroad.
- NIST Manufacturing Extension Partnership — Federal program supporting US small and mid-size manufacturers.
Frequently asked questions
What is the maker movement?
It is the culture and community around building physical things with accessible tools — 3D printers, laser cutters, desktop CNC, open-source electronics — usually in shared makerspaces or fab labs, and usually with designs and knowledge shared openly rather than kept proprietary.
Can a 3D printed prototype be sold as a product?
Sometimes, at low volume and high price, and printing is a legitimate production method for short runs and spare parts. It stops making sense as volume grows, because printed parts carry high per-unit cost, anisotropic strength and cosmetic limits that molded parts do not.
How much does it cost to move from prototype to production?
It depends on part count, process and certification. A simple molded product with a few parts is typically a design-for-manufacturing effort plus tooling in the low tens of thousands; a connected device with certifications, custom electronics and multiple molds runs materially higher. Get a quoted cost model before committing to a launch price.
Do I need a patent before showing a maker project publicly?
Public disclosure can start or forfeit filing windows depending on jurisdiction, so if the idea is patentable, talk to an attorney before the maker faire, the demo video or the crowdfunding page. A provisional filing is the common inexpensive way to keep the option open. Rapid prototyping services. Design for manufacturing. Prototypes, MVPs and patents: where to begin. What product development costs
Filed under:InspirationTech
Services related to this guide
- Product design servicesIndustrial design and CAD taken all the way to manufacturable files.
- Rapid prototypingWorking prototypes in days, from 3D printing to vacuum casting.
- Electronic design servicesSchematic, PCB layout, firmware and bring-up, through to production handoff.
- Product development examplesReal projects we designed, prototyped and shipped.