
How to Reduce Product Development Costs
Development budgets are blown by rework, not by expensive engineering. Here is where the money goes by phase, the six levers that reduce it, and the false economies that raise total cost.
May 19, 20188 min read

Written by Konstantin Dolgan, Ph.D., NPDP
Founder & CEO, Product Development Engineer
Published May 19, 2018Updated September 2, 2026
How to Reduce Product Development Costs Without Wrecking the Product
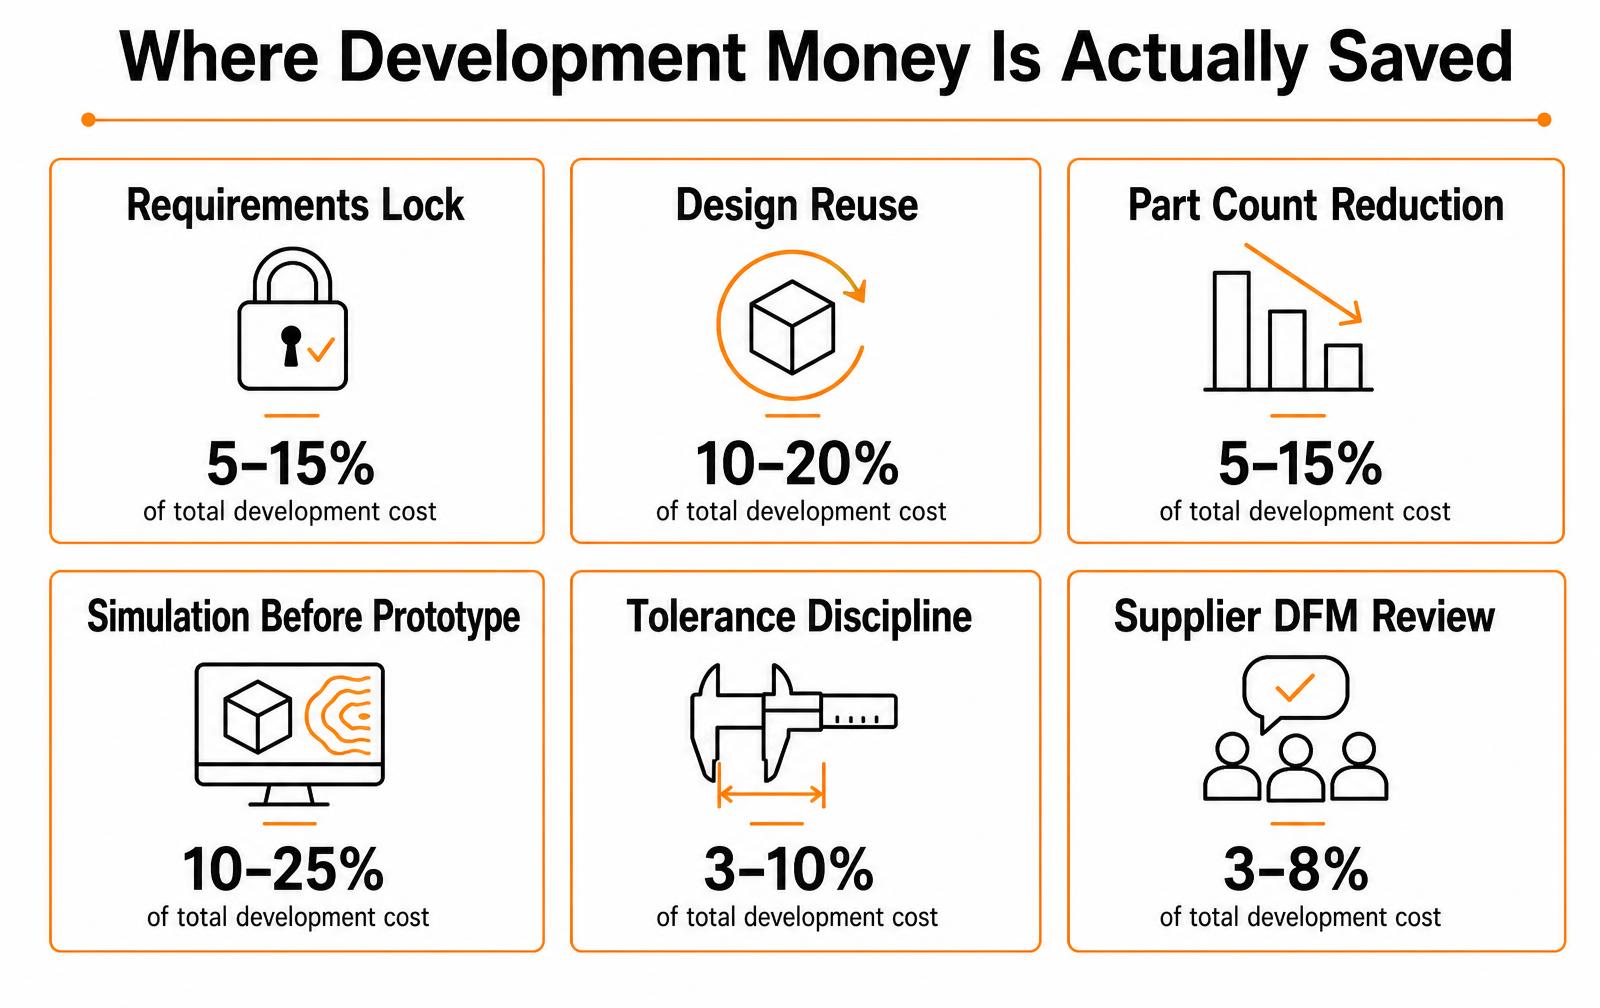
Development budgets are rarely blown by expensive engineering. They are blown by rework — requirements that moved, prototypes built to answer questions a simulation could have answered, and design decisions locked in before anyone asked a manufacturer what they cost. Every durable saving below comes from removing a loop, not from buying cheaper hours.
This guide covers where money actually goes by phase, the six levers that reduce it, the false economies that increase total cost, and how to tell the difference before you commit.
Where the money actually goes
A typical funded hardware program spends far less on the phase people worry about — engineering — than on the consequences of decisions made before it.
Phase | Share of program spend | Where it leaks |
|---|---|---|
Discovery and requirements | 5–10% | Skipped entirely, then paid for later in redesign |
Industrial and concept design | 10–15% | Concepts explored without cost or manufacturing input |
Engineering and CAD | 25–35% | Rework from moving requirements |
Prototyping and testing | 15–25% | Physical builds answering questions analysis could settle |
Design for manufacture and tooling | 20–30% | Late DFM forcing tooling changes after cutting steel |
Certification and compliance | 5–15% | Discovered at the end, redesign to pass |
Shares vary by product class — connected devices carry more certification cost, moulded consumer goods more tooling. The pattern holds: the earliest and cheapest phases determine the largest ones.
A change costs roughly ten times more at each stage it survives undetected: cheap in requirements, painful in CAD, brutal after tooling.
Lever 1: Lock requirements before CAD, not after
The single largest avoidable cost in hardware is engineering against a target that keeps moving. Before modelling begins, write down the numbers a design either meets or fails: target landed cost, size and weight envelope, battery life or duty cycle, environmental and drop requirements, applicable certifications, and target launch volume. Anything not on that list is a preference and must be labelled as one.
- Give every requirement a number and a verification method — “durable” is not a requirement, “survives 1.2 m drop on concrete, six orientations” is.
- Rank must-have against nice-to-have before the first concept, because it will be decided under pressure otherwise.
- Set the cost target first and design to it; costing a finished design usually means redesigning it.
- Freeze the list at a named date and treat later changes as scoped change orders, not conversations.
Lever 2: Reuse instead of designing from zero
Custom parts cost money three times: to design, to tool, and to qualify. Off-the-shelf and previously validated parts arrive with datasheets, supply history and known failure behaviour.
Element | Reuse option | Why it saves |
|---|---|---|
Enclosure | Standard extrusion or stock housing with custom panels | Avoids injection tooling entirely at low volume |
Electronics | Reference design or certified module | Removes weeks of layout and pre-compliance debugging |
Fasteners and seals | Catalogue hardware in existing sizes | No qualification, no minimum order surprises |
Power | Standard cell format and off-the-shelf charger IC | Sidesteps custom pack certification |
Firmware | Vendor SDK and proven stack | Cuts integration and test time |
Reserve custom work for the parts that carry the differentiation. Everything else should be boring on purpose.
Lever 3: Cut part count
Every part carries a drawing, a supplier, a tolerance stack, an inspection step and an assembly operation. Removing one removes all of them. Consolidate brackets into a single moulding, use snap fits where fasteners are not required for service, integrate features into existing surfaces, and delete parts whose only job is to correct another part's tolerance. Fewer parts also shorten assembly time, which is where labour cost lives.
Lever 4: Simulate before you build
Prototypes are for questions that require physical reality — fit in the hand, thermal behaviour in a real enclosure, user error, drop damage. Questions about stress, deflection, mould flow, tolerance stack-up and basic thermals should be answered analytically first, and the prototype used to confirm the result.
Question | Cheapest way to answer |
|---|---|
Will this bracket deflect under load? | FEA before any build |
Will the moulding fill and warp? | Mould-flow analysis with the supplier |
Do the tolerances stack into interference? | Tolerance analysis in CAD |
Does it feel right in the hand? | Low-cost printed appearance model |
Does the battery last a full shift? | Instrumented functional prototype |
Does a first-time user do the wrong thing? | Usability test on a working build |
Sequence the builds so each one answers several open questions at once. Our rapid prototyping guide covers matching prototype fidelity to the question being asked.
Lever 5: Hold tolerances only where they matter
Blanket tight tolerances are one of the most expensive habits in mechanical design. Tightening a dimension by one class can raise part cost noticeably and cut the number of shops willing to quote. Identify the few critical-to-function dimensions, tolerance those properly, and open everything else to standard shop capability. The same applies to surface finish and cosmetic specifications, which quietly drive scrap rates.
Lever 6: Get manufacturing input before the design is finished
A DFM review with the shop that will actually build the part is usually free and routinely returns changes worth more than the entire engineering fee: wall thickness adjustments, draft angles, a different fastening approach, a material substitution with the same properties and a shorter lead time.
Ask for it at concept freeze and again before tooling release, not after. Our checklist for vetting manufacturing partners covers what a serious DFM response looks like.
False economies that raise total cost
- Skipping discovery. The cheapest phase to cut is the one that prevents the expensive ones.
- Choosing the lowest hourly rate. Slow, unclear engineering costs more per delivered result than expensive engineering that is right.
- Splitting design and DFM across disconnected vendors. Rework at the handoff usually exceeds the saving.
- Tooling too early. Steel cut before design freeze is the most expensive change you can make.
- Deferring certification planning. Compliance failures near launch force redesign at the worst possible moment.
- Buying one prototype at a time. Each round carries setup and shipping; batching questions cuts rounds.
A practical cost-control routine
- Set a target landed cost and a bill-of-materials budget per subsystem at kickoff.
- Track cost at every design review, not only at the end.
- Require a written reason for every requirement change and price it before accepting.
- Batch prototype questions into fewer, better-instrumented builds.
- Book DFM reviews at concept freeze and before tooling release.
- Re-quote the bill of materials at design freeze; component pricing moves.
For a phase-by-phase view of what development actually costs, see our mass production cost guide and the product discovery process that sets the requirements in the first place.
Frequently asked questions
What is the biggest cost driver in product development?
Rework caused by unstable requirements. Engineering hours are visible on an invoice, but the cost that dominates a program is redesigning work already done because a target moved or a manufacturing constraint surfaced late. Locking numeric requirements before CAD and getting DFM input before design freeze removes most of it.
How can a startup reduce product development costs?
Write numeric requirements before modelling, reuse off-the-shelf enclosures, modules and reference designs for everything that is not the differentiator, answer analytical questions with simulation instead of prototypes, batch prototype rounds, tolerance only the critical dimensions, and request a DFM review before the design is frozen.
Is it cheaper to use one firm for design and manufacturing support?
Usually yes for the total, even when the hourly rate is higher. Split vendors create handoffs where drawings are reinterpreted and manufacturing feedback arrives after the design is committed. A single accountable team catches those constraints during design, when changing them is still cheap.
How much does it cost to develop a new product?
It depends on complexity, but the proportions are more useful than a single number: roughly 5–10% on discovery, 10–15% on concept and industrial design, 25–35% on engineering, 15–25% on prototyping and testing, 20–30% on design for manufacture and tooling, and 5–15% on certification. Connected devices skew toward certification, moulded goods toward tooling.
Do prototypes save money or waste it?
They save money when each build answers questions that require physical reality — fit, feel, thermals in a real enclosure, drop performance, user behaviour — and waste it when they answer questions simulation could settle for free. Batch several open questions into each build rather than printing a new revision for every small change.
When is it too late to reduce product cost?
Practically, once production tooling is cut. Around 70–80% of a product's unit cost is committed by the end of detailed design, so cost reduction after tooling release is limited to negotiation and small process changes. Serious cost work belongs in requirements, part-count reduction and DFM.
Packaging and freight: the cost nobody designs for
Packaging is usually specified last and then carried as a fixed cost forever. It does not have to be. Because parcel carriers bill on dimensional weight, small geometry decisions made during product design can change shipping cost per unit more than a supplier negotiation ever will — and shipping is often a larger line item than the packaging itself.
Levers that reduce packaging and freight cost
Lever | Typical saving | Where it must be decided |
|---|---|---|
Reduce box dimensions below a rate break | 5-20% of freight | Product design phase |
Nest or disassemble for shipping | 10-30% of freight | Product architecture |
Ship in own container (no overbox) | 10-25% of packaging cost | Channel and packaging design |
Molded pulp instead of foam | 0-15%, plus brand benefit | Packaging design, needs tooling time |
Right-size the master carton to the pallet | 5-15% of inbound freight | Packaging engineering |
Reduce weight below a carrier threshold | Varies by lane | Product and packaging together |
Do the arithmetic on dimensional weight early: for many products the billable weight is set by box volume, not by mass, which means shaving a centimetre off a dimension can matter more than removing material from the part.
Packaging cost checklist
- Calculate dimensional weight for your actual carrier and lane.
- Check whether small dimension changes cross a rate break.
- Compare pack formats at landed cost, not unit packaging price.
- Validate any reduced pack with ISTA drop and vibration testing.
- Optimize master carton and pallet fit, not just the retail box.
Key takeaways
- Freight, driven by box volume, often exceeds packaging material cost.
- Packaging cost is decided during product design, not at the end.
- Always revalidate a reduced pack with drop and vibration testing.
Where packaging quietly inflates a product budget
Packaging is one of the last decisions taken and one of the largest recurring costs in a consumer product programme. Because it is specified after the product is frozen, it inherits every awkward dimension and fragile feature the design created, and the resulting cost is treated as unavoidable. It rarely is. Most programmes can remove 15 to 30 percent of packaging cost by revisiting five decisions before artwork is released.
Lever | Typical saving | What it costs you |
|---|---|---|
Right-size the carton to the product | 8-20% on board and freight | One extra dieline iteration |
Cut a colour or switch to flexo | 5-12% on print | Slightly reduced photographic fidelity |
Standard carton size instead of custom | 5-15% plus shorter lead time | Less distinctive shelf presence |
Reduce board grade with a structural test | 4-10% | Drop and compression testing |
Improve pallet fill (Ti-Hi optimisation) | 5-15% on inbound freight | Re-run of case dimensions |
Combine inner and outer into one pack | 10-25% on materials and labour | Requires damage testing |
Cost reduction that does not damage the product
The difference between cost reduction and cost cutting is whether the customer can detect it. Removing a colour from a carton, standardising a fastener, or consolidating two moulded parts into one is invisible in use.
Thinning a wall until the housing flexes, downgrading a bearing, or removing a drop-test margin is visible immediately — usually in returns data.
Score every candidate saving against three questions: does it change how the product feels in the hand, does it change how long it lasts, and does it change how it survives transit?
- Consolidate parts. Every part removed deletes a tool, a supplier line, an inspection step and an assembly operation.
- Standardise fasteners and finishes. Three screw types become one; two paint colours become one plus a moulded-in colour.
- Requote at the real volume. Quotes built on optimistic first-year volume mislead; requote at the volume you will actually order in year one.
- Move tolerance where it is free. Tight tolerances on non-functional surfaces add scrap for no benefit.
- Review freight as part of unit cost. A package that adds two centimetres can drop pallet count per container and outweigh every material saving.
When to stop optimising
Cost engineering has diminishing returns. Once the remaining candidate savings are each under about one percent of unit cost and require re-testing, the engineering hours and schedule delay usually exceed the benefit. At that point the leverage moves to volume commitments, payment terms and freight consolidation, which are commercial negotiations rather than design changes.
Key takeaways
- Specify packaging alongside the product, not after it is frozen.
- Right-sizing and pallet fill often beat material substitution on total cost.
- Only pursue savings the customer cannot detect in feel, durability or transit.
- Requote at realistic year-one volume before locking the business case.
- Stop when remaining savings fall below roughly one percent of unit cost.
Need to bring a development budget back under control?
Work with LA NPDT: if you are moving from here to execution, start with our our product development process or talk to us about end-to-end product development.
Filed under:Education
Tagged:Product Design
Services related to this guide
- Free prototype cost calculatorFive to eight questions, an instant cost range for a first prototype.
- Prototype designLooks-like, works-like or pre-production: what each proves and what it costs.
- Rapid prototypingWorking prototypes in days, from 3D printing to vacuum casting.
- Best product development companiesHow the leading US firms compare, and which one fits your stage and budget.