Injection Molding Tooling Cost: Molds, Part Price and Break-Even
Injection molding tooling cost by mold class and cavitation, how it amortizes into part price, and where the break-even against machining and printing sits.
October 28, 20196 min read

Written by Konstantin Dolgan, Ph.D., NPDP
Founder & CEO, Product Development Engineer
Published October 28, 2019Updated September 2, 2026
Injection molding cost is two numbers, not one: a one-time tool and a per-part price that only makes sense once you amortise that tool across real volume. A $30,000 mold producing a $0.40 part is expensive at 500 units and almost free at 200,000. Get the volume assumption right and the rest of the maths follows.
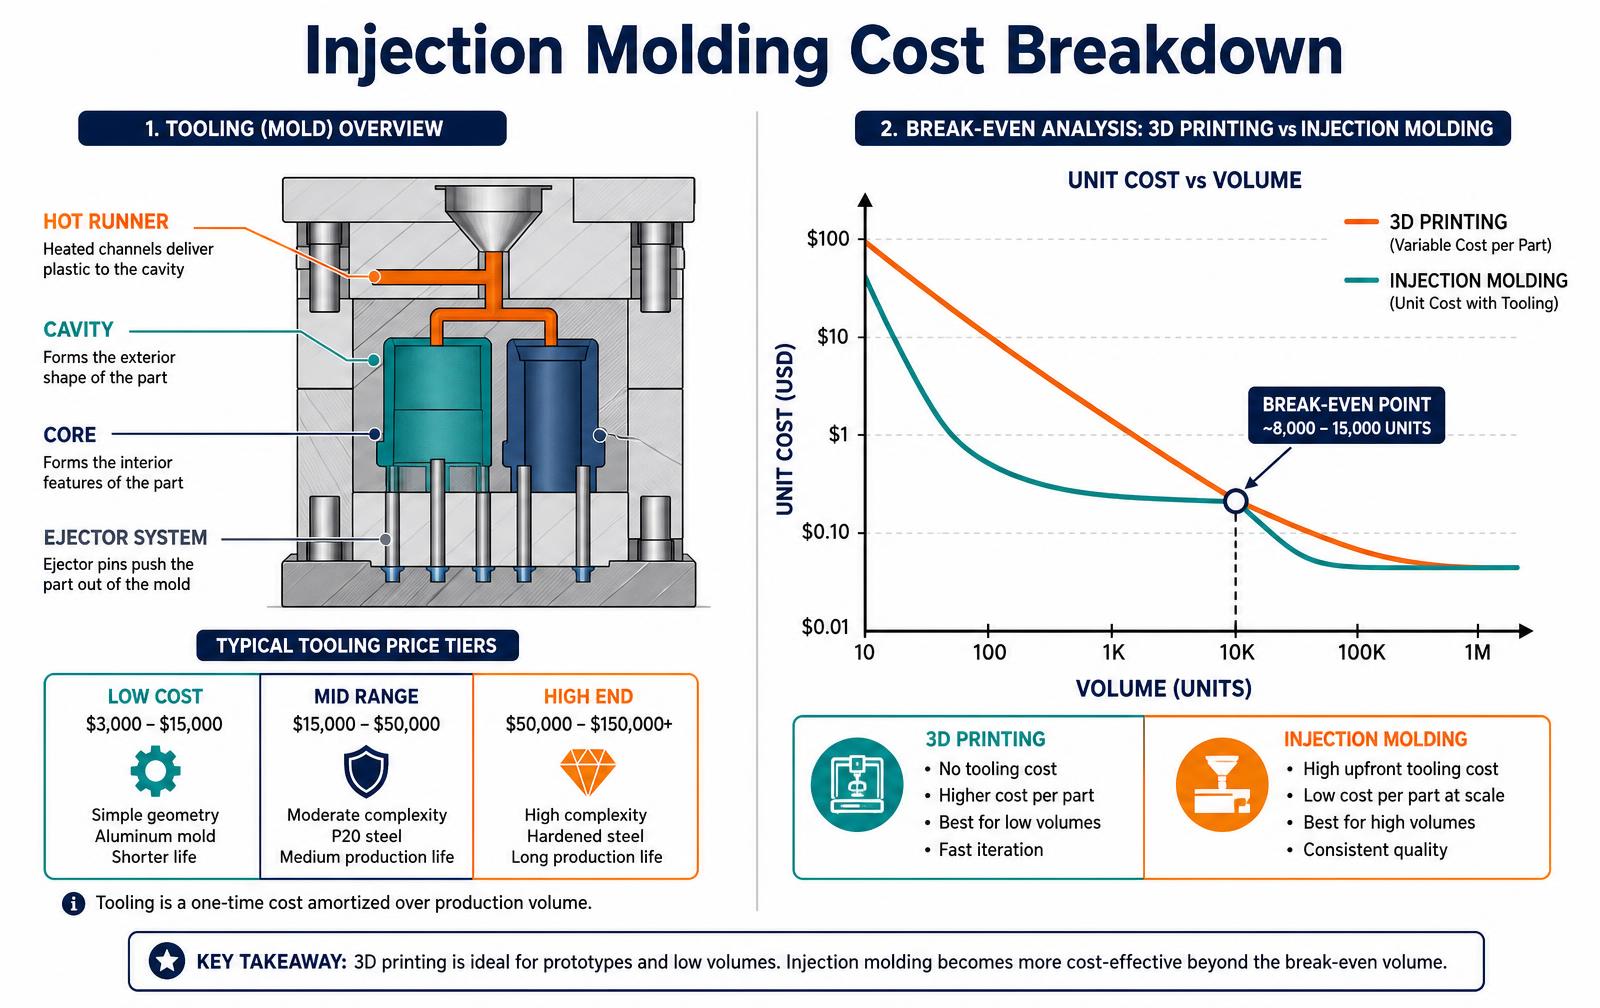
Tooling tiers
Tool class | Typical cost | Expected life | Best for |
|---|---|---|---|
Aluminium bridge tool | $3k-$15k | 1k-10k shots | Pilot runs, market tests, design still moving |
P20 steel, single cavity | $15k-$50k | 100k-500k shots | Production launch at moderate volume |
Hardened steel, multi-cavity | $50k-$150k+ | 1M+ shots | High volume, tight cycle time, glass-filled resins |
Family or insert tool | $20k-$60k | Varies | Several related parts sharing one base |
What drives the per-part price
- Cycle time. Wall thickness dominates it. Trimming a 3 mm wall to 2 mm can cut cooling time nearly in half and takes the same percentage off the machine-rate portion of the part price.
- Cavitation. Four cavities quarter the machine time per part and roughly triple the tool cost — worth it above a few hundred thousand units.
- Resin. Commodity PP or ABS runs $1-$3 per kg; glass-filled nylon, PC blends and medical-grade resins run several times that and wear tooling faster.
- Secondary operations. Pad printing, ultrasonic welding, inserts and manual degating are often more than the moulding itself on small parts.
- Scrap and startup. Budget a few hundred shots per run for process qualification, especially on textured or cosmetic parts.
Finding your break-even
Divide the tool cost by the per-part saving against your next-best process. A $25,000 tool that drops a part from $6.00 printed to $0.70 moulded pays back at roughly 4,700 units. Below that, print or machine; above it, tool up. Run the same calculation for a bridge tool — an aluminium mold often gets a product to market a quarter earlier while the steel tool is cut.
Related reading: choosing 3D printers for prototyping and product development companies.
Quoting checklist before you commit to a tool
- Lock the part revision. Every geometry change after tool cutting is a steel change order at $500-$5,000 each.
- Confirm cavitation and cycle assumptions. A 2-cavity tool at 40 seconds is a very different part price than 4-cavity at 30.
- Ask who owns the tool. Get it in writing, including the right to move it to another molder.
- Specify the resin and colorant now. Shrink rates differ; a resin swap after steel is cut can scrap the tool.
- Budget for T1 through T3 samples. Three trial rounds and dimensional reports are normal, not a failure.
Common tooling surprises
Surprise | Typical added cost | How to avoid it |
|---|---|---|
Undercuts needing side actions | $3k-$12k per action | Redesign snaps and vents for straight pull |
Sink marks on thick bosses | 1-2 week rework | Core out ribs to 60% of nominal wall |
Cosmetic texture rejects | $1.5k-$6k retexture | Approve a texture plaque in the final resin |
Gate vestige in a visible area | $2k-$8k gate relocation | Agree gate location on the CAD before cutting |
Warp on flat panels | $5k+ and schedule slip | Run mold flow before steel, not after T1 |
Tooling cost, part price and where they cross
Injection molding trades a large one-time tooling cost for a low per-part price. The decision is arithmetic: divide the tool cost by the per-part savings versus your next-best process, and you have the break-even volume.
A single-cavity aluminum prototype tool at $6,000 producing parts at $1.10 beats CNC machining at $28 per part after roughly 225 units. A hardened multi-cavity production tool at $45,000 producing parts at $0.42 only makes sense once annual volume clears tens of thousands.
Cavitation, steel grade and part complexity move the tooling number far more than part size does.
Tool type | Typical cost | Expected life | Best for |
|---|---|---|---|
Aluminum bridge tool | $4,000-$12,000 | 1,000-10,000 shots | Pilot runs, market tests |
Single-cavity P20 steel | $12,000-$30,000 | 250,000+ shots | Low-volume production |
Multi-cavity hardened steel | $35,000-$120,000 | 1,000,000+ shots | High-volume consumer parts |
Overmold / two-shot | $45,000-$150,000 | 500,000+ shots | Soft-touch or sealed assemblies |
Insert molding tool | $20,000-$70,000 | 250,000+ shots | Embedded metal or electronics |
Design choices that cut tooling cost
- Remove undercuts before adding side actions; each slide adds cost and cycle time.
- Keep wall thickness uniform to avoid sink, warp and long cooling cycles.
- Add generous draft (1-2 degrees minimum) so ejection does not scar cosmetic faces.
- Consolidate parts only when it does not force a complex tool; two simple tools can beat one difficult one.
- Choose a texture late, but confirm the draft required for it early.
- Ask the molder for a mold-flow simulation before steel is cut.
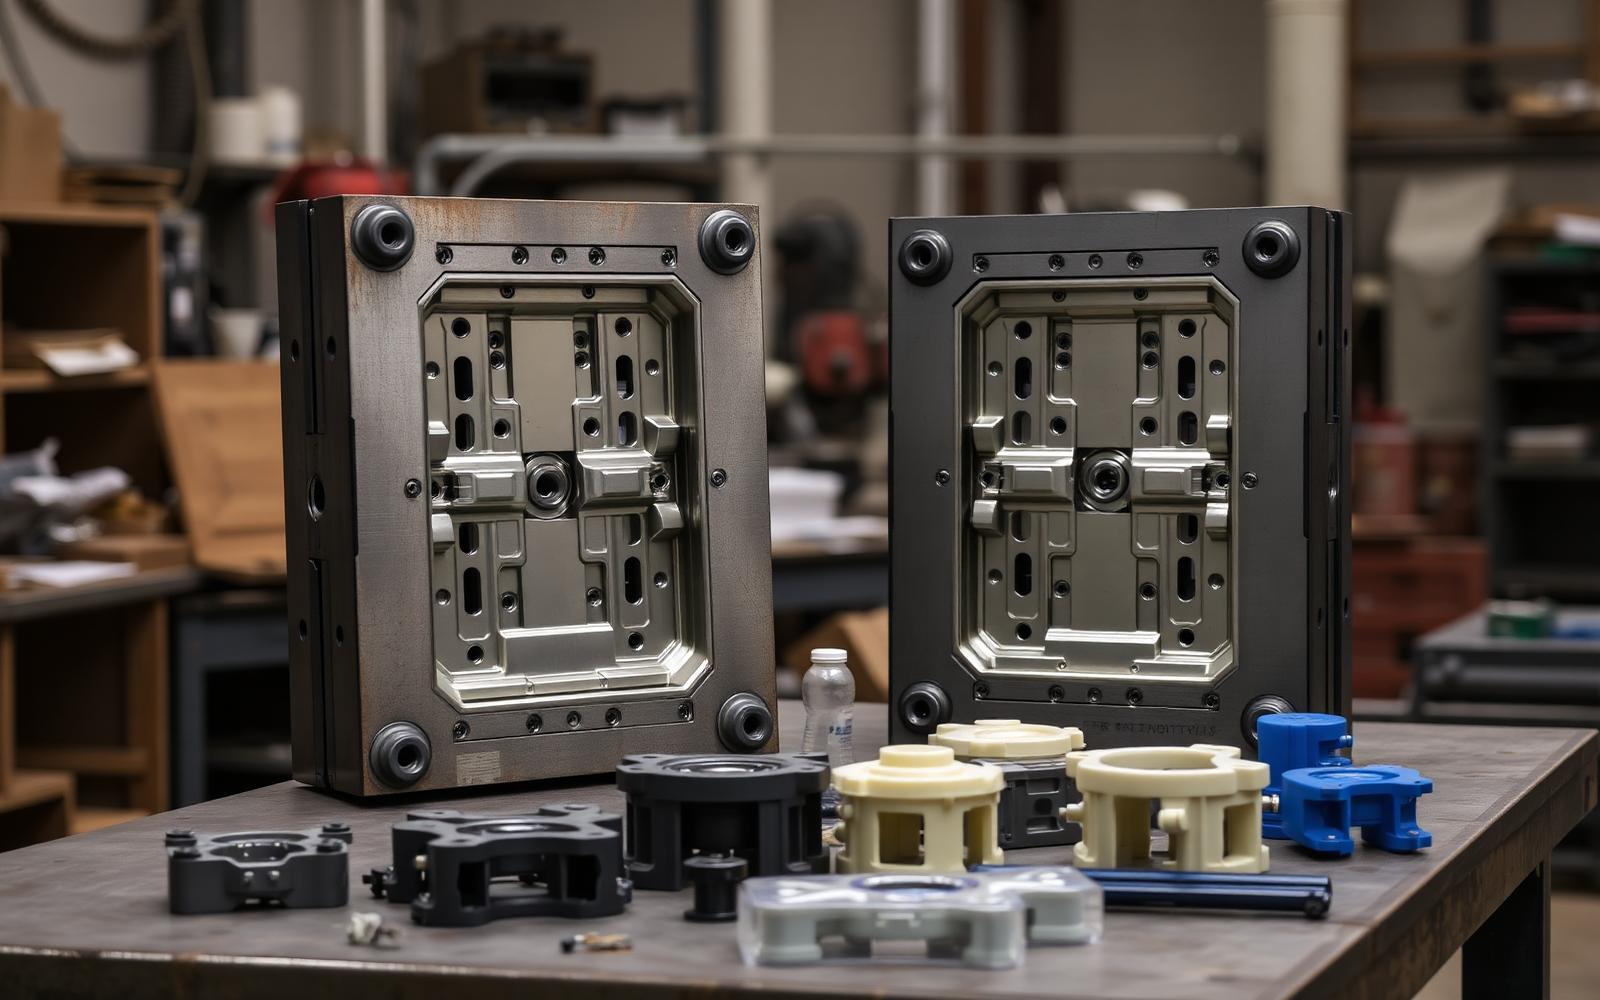
A worked break-even example
Take a housing that costs $26 per part machined from ABS and $1.35 per part molded, with a $16,000 single-cavity steel tool. The per-part saving is $24.65, so the tool pays for itself at roughly 650 units.
If your first-year forecast is 400 units, machining or a $7,000 aluminum bridge tool is the rational choice, and you defer the steel decision until real demand data exists. If the forecast is 5,000 units, the steel tool saves more than $100,000 in the first year and shortens lead times as well.
Run this arithmetic before every tooling decision, and run it again with a pessimistic forecast. The most common expensive mistake in hardware is buying production tooling against an optimistic sales plan; the second most common is staying on machined parts long after volume justified a tool.
Annual volume | Best option | First-year part spend | Tooling spend |
|---|---|---|---|
Under 300 | CNC machining | $7,800 | $0 |
300-1,000 | Aluminum bridge tool | $1,350 | $7,000 |
1,000-10,000 | Single-cavity steel | $13,500 | $16,000 |
10,000-50,000 | Two-cavity hardened steel | $21,000 | $38,000 |
Over 50,000 | Multi-cavity hardened steel | $25,200 | $85,000 |
Mold cost by class and cavity count
Tooling price is driven by steel hardness, cavity count, part complexity and where the tool is built. SPI classifications set the expected life, and buying a longer-life tool than the program needs is one of the most common ways early-stage companies overspend.
Mold class | Rated life (shots) | Typical cost, single cavity | Fits |
|---|---|---|---|
Class 105 (prototype) | under 500 | $1,500–$6,000 | Bridge parts, fit checks |
Class 104 (aluminum) | up to 100k | $3,500–$15,000 | Pilot runs, low volume |
Class 103 | up to 500k | $8,000–$35,000 | Most consumer programs |
Class 102 | up to 1M | $20,000–$70,000 | High-volume, abrasive resins |
Class 101 | 1M+ | $40,000–$150,000+ | Long-life, 24/7 production |
Break-even math you can do on a napkin
Compare tooling amortization against the per-part delta. If a printed or cast part costs $9 and a molded part costs $1.40, the $7.60 saving covers a $22,000 tool at roughly 2,900 units. Below that, tooling loses. Above it, the tool pays for itself and keeps paying — which is why bridge tooling exists: it buys production time at a modest tooling cost while the steel tool is cut.
Annual volume | Sensible tooling | Tooling cost | Molded part cost |
|---|---|---|---|
Under 500 | None — print or cast | $0 | $8–$40 |
500–5,000 | Aluminum, 1 cavity | $4k–$15k | $1.50–$6 |
5,000–50,000 | P20 steel, 1–2 cavity | $15k–$45k | $0.90–$4 |
50,000–250,000 | Hardened steel, 4–8 cavity | $45k–$120k | $0.45–$2.50 |
Design choices that move tooling cost most
- Undercuts requiring side actions or lifters typically add $2,000–$8,000 each to the tool.
- Draft angle: under one degree on a textured surface forces polishing or ejection problems.
- Wall thickness variation causes sink and warp, which is fixed with tool rework, not process tuning.
- Cosmetic A-surfaces raise polish grade and cost; specify SPI finish deliberately.
- Family tools save money up front and cost flexibility later — balance runners only work if part volumes match.
- Gate location decides where the weld line lands; approve it in DFM rather than discovering it on T1.
What to expect from T1 to production
First samples (T1) arrive four to twelve weeks after tool kickoff and rarely pass on the first attempt. Budget two revision cycles of two to three weeks each and expect changes to dimensions, sink and cosmetics. Steel-safe design — leaving material where changes are likely — is what makes those revisions cheap: adding steel to a tool means welding and re-cutting, while removing it is a routine machining pass.
We manage tooling programs with domestic and overseas molders — see development services.
Frequently asked questions
Tool class, cavitation and what actually drives the quote
How much does injection molding cost?
Two quotes for the same part can differ by 4x because the tool underneath them is not the same machine. Tooling price is set by four levers: steel hardness (tool class), number of cavities, the number of side actions or lifters needed to release undercuts, and the surface finish specification. Before you compare vendors, normalise these four lines or you are comparing a bridge tool to a 1-million-shot production mold.
Tooling typically runs $3,000 to $150,000 depending on tool class, cavitation and part complexity. Per-part cost for a common consumer part is usually $0.20 to $3.00 once tooling is amortised over production volume.
Tool class | Typical steel | Rated shots | Tool cost (single cavity) | When it fits |
|---|---|---|---|---|
Class 105 (bridge) | Aluminium 7075 | 500-5,000 | $3,000-$12,000 | Market test, pilot builds, pre-order validation |
Class 104 | P20 pre-hard | under 100,000 | $10,000-$30,000 | Low-volume consumer, industrial housings |
Class 103 | P20 / H13 hardened inserts | under 500,000 | $20,000-$60,000 | Steady-state consumer volumes |
Class 102 | H13 hardened, 48-52 HRC | under 1,000,000 | $45,000-$110,000 | High-cycle, glass-filled resins |
Class 101 | S7 / stainless, hardened | 1,000,000+ | $80,000-$250,000 | Medical, packaging, 24/7 running |
At what volume does injection molding beat 3D printing?
Break-even math you can run in one sitting
Commonly between 1,000 and 15,000 units. Divide the tool cost by the per-part saving versus printing: small, simple parts with cheap aluminium tooling cross over in the low thousands, while large or complex parts needing steel tooling cross over closer to twenty thousand.
Break-even volume equals tool cost divided by the per-unit saving versus your next-best process. If a hardened tool costs $38,000 and drops the part from $9.40 printed to $1.15 molded, the saving is $8.25 and break-even lands at roughly 4,600 units. Run the same math against a $9,000 aluminium bridge tool at $1.60 per part and break-even falls near 1,150 units - which is why bridge tooling wins when the demand forecast is still an estimate.
Add the hidden lines before you sign: first-article inspection, texture and polish passes, a resin-change purge allowance, and two rounds of engineering change orders. Budget 12-18% of tool cost for changes on a first-generation part.
How long does an injection mold take to build?
Design-for-moldability rules that cut tooling cost
Aluminium bridge tools are usually two to four weeks. Production steel tools run six to twelve weeks, plus one to three weeks of sampling and process qualification before parts are approved.
- Hold nominal wall within 10% across the part; thick-to-thin transitions cause sink and add polish cycles.
- Draft every vertical face: 1 degree minimum on smooth surfaces, 3 degrees or more on textured ones.
- Replace undercuts with pass-through geometry or a shutoff wherever possible - each side action adds $2,000-$8,000 and a maintenance point.
- Core out bosses and ribs to 60% of nominal wall to prevent sink marks on the A-surface.
- Specify texture (MoldTech or VDI number) before steel is cut; adding texture later means re-polishing and re-benching.
Key takeaways
Cost of change once steel is cut
- Break-even volume, not tool price, decides whether to mold a part.
- Bridge tooling buys market data before hardened steel is justified.
- Undercuts, wall variation and texture drive tooling cost.
- Ask for mold-flow simulation before steel is cut.
Change type | Typical cost | Schedule hit | Notes |
|---|---|---|---|
Add material (weld and re-cut) | $800-$4,000 | 1-2 weeks | Weld lines can show on cosmetic faces |
Remove material (open cavity) | $400-$1,500 | 3-7 days | Easy direction - design thick, cut later |
Add a side action | $2,500-$8,000 | 2-4 weeks | May require a new mold base |
Change gate location | $1,000-$3,500 | 1-2 weeks | Re-validate warp and weld-line position |
New cavity insert | $6,000-$20,000 | 4-6 weeks | Cheaper than a new tool if the base is reusable |
Getting ready to tool a part?
We design parts for moldability and quote tooling with the numbers behind it.
Work with LA NPDT: if you are moving from here to execution, start with our design optimization or talk to us about low-volume manufacturing.
Filed under:Tech Talk Podcast
Tagged:GoogleInnovationLatestNewNewsSamsungTechTechnologyUpdates
Services related to this guide
- Product design servicesIndustrial design and CAD taken all the way to manufacturable files.
- Rapid prototypingWorking prototypes in days, from 3D printing to vacuum casting.
- Electronic design servicesSchematic, PCB layout, firmware and bring-up, through to production handoff.
- Product development examplesReal projects we designed, prototyped and shipped.