
Injection Plastic Molding: Process, Tooling and Cost Guide
Injection plastic molding turns a design into millions of identical parts. Here is how the process works, what tooling costs, and where unit price actually comes from.
November 19, 20197 min read

Written by Konstantin Dolgan, Ph.D., NPDP
Founder & CEO, Product Development Engineer
Published November 19, 2019Updated August 19, 2026
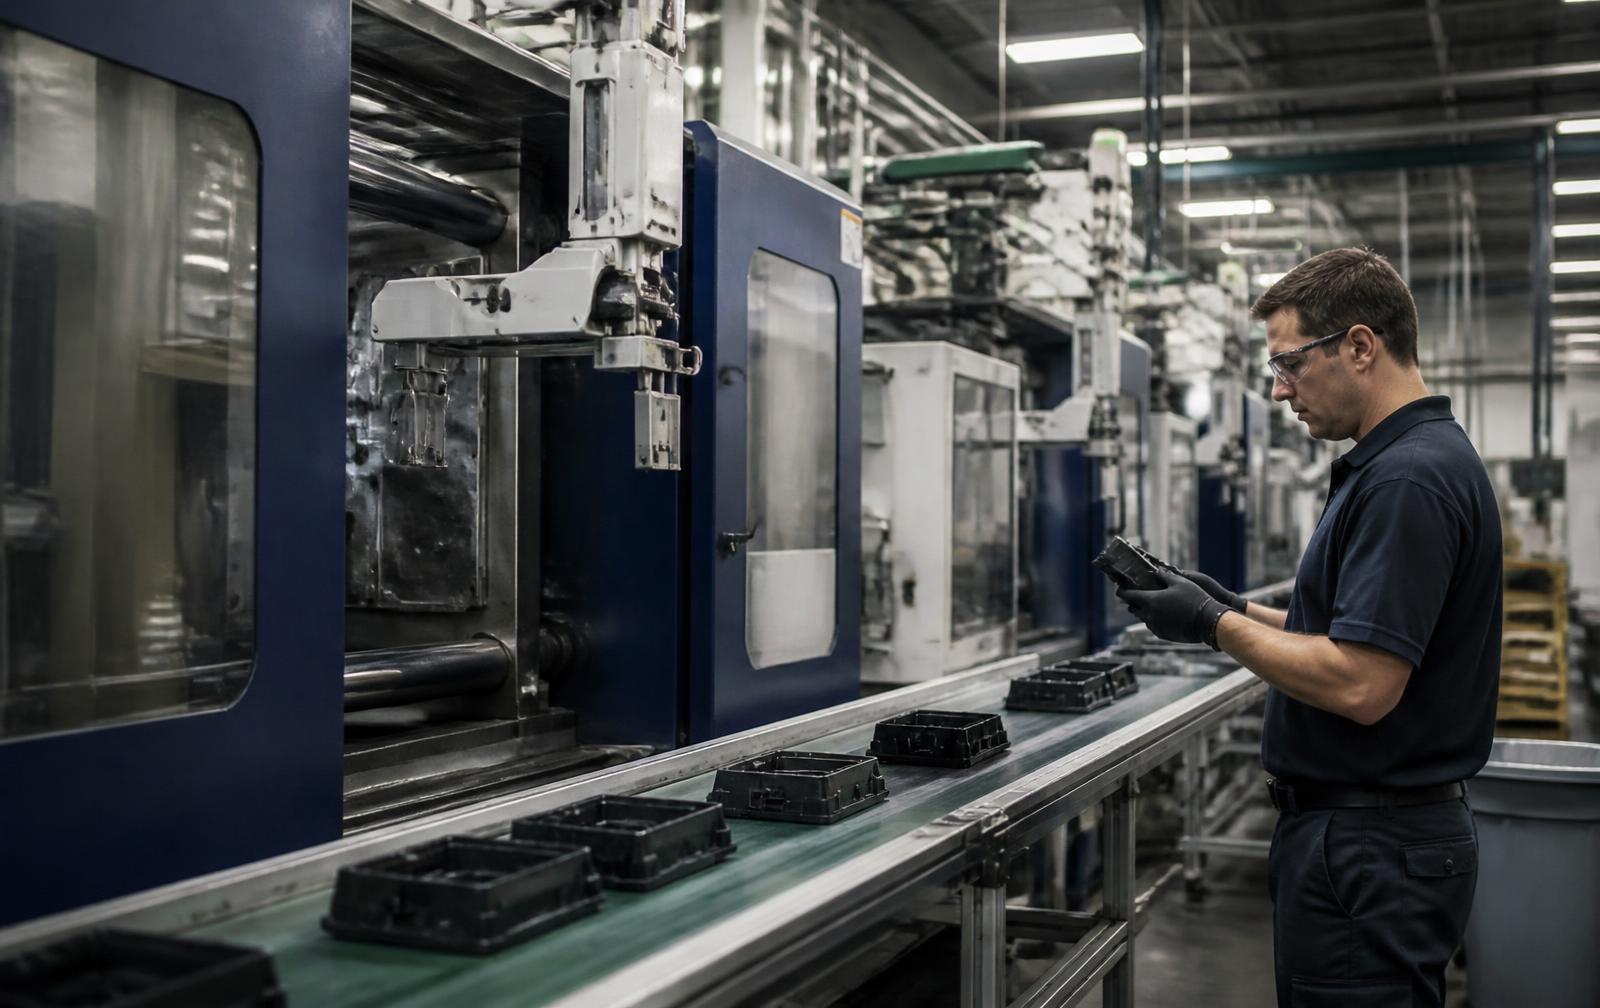
Injection plastic molding melts thermoplastic pellets and forces them under pressure into a steel or aluminum mold, where the part cools and is ejected in seconds. It is the cheapest way to make the same plastic part thousands of times — once you have paid for the tool. The whole decision is a trade between tooling cost up front and part cost forever after.
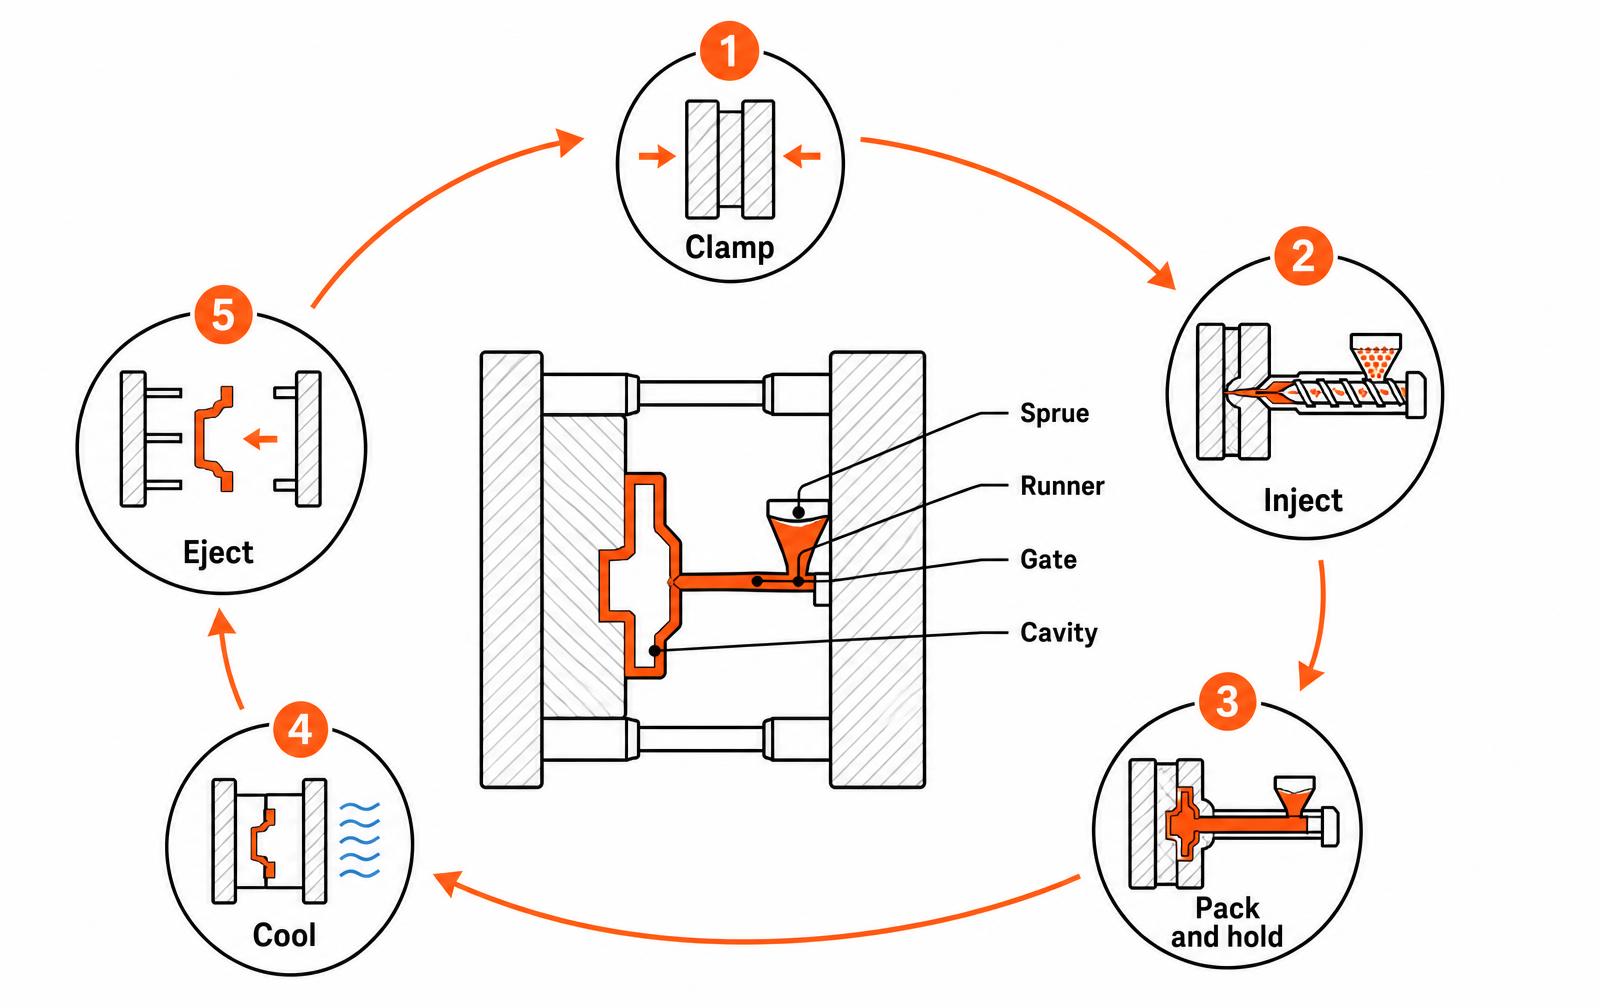
How the injection molding cycle works
- Clamp. The two mold halves close and the press holds them shut against injection pressure. Clamp tonnage is set by projected part area, not part weight.
- Inject. A reciprocating screw pushes melt through the sprue, runner and gate into the cavity, typically in under two seconds.
- Pack and hold. Extra pressure feeds material in as the plastic shrinks. Skimp here and you get sink marks and voids.
- Cool. The longest phase, usually 50-70% of cycle time. Cooling scales with the square of wall thickness, which is why thick walls are expensive.
- Eject. Pins push the part off the core. Draft angle and ejector placement decide whether it comes off clean or scuffed.
What injection molding tooling costs
Tooling is the number that surprises people. Molds are classified by expected life (the SPI/ SPE classes below), and the class you buy should match the volume you actually expect in the next two years — not the volume in the pitch deck.
Tool class | Material | Typical shots | Typical cost (single cavity) | Best for |
|---|---|---|---|---|
Prototype / bridge | Aluminum | Up to ~10,000 | $3,000 - $12,000 | Market tests, pilot runs, design still moving |
Class 103 | P20 steel | Up to ~500,000 | $12,000 - $40,000 | Most consumer and industrial products |
Class 102 | Hardened steel | Up to ~1,000,000 | $30,000 - $80,000 | High volume, abrasive or glass-filled resins |
Class 101 | Hardened steel, full automation | 1,000,000+ | $60,000 - $250,000+ | Commodity parts running 24/7 |
Cost drivers inside a class: number of cavities, side actions and lifters for undercuts, surface finish (a polished optical finish can add thousands), tolerance callouts, and how many engineering changes you make after the steel is cut. Cutting steel twice is the single most avoidable expense in plastic injection molding.
Part cost: the math that decides your break-even
Piece price is roughly material + machine time + labor + scrap + margin. Material is part weight times resin price plus runner waste. Machine time is cycle time times the hourly press rate divided by the number of cavities. A 30-second cycle on a $60/hour press in a two-cavity tool is about $0.25 of machine time per part; the same part in a four-cavity tool is about $0.13.
Compare that against alternatives before committing. Below roughly 1,000-2,000 parts, 3D printing or urethane casting usually wins. Between there and full production, a bridge tool buys you time. See our economics of tooling breakdown for the full model.
Choosing a resin
Resin | Why teams pick it | Watch out for |
|---|---|---|
ABS | Tough, easy to mold, paints and plates well | Poor UV resistance outdoors |
PC | High impact strength, optical clarity | Notch sensitive; needs drying before molding |
PC/ABS | Balance of toughness and processability | Costs more than either base resin |
PP | Cheap, chemically resistant, living hinges | High shrink; warps in thin flat panels |
Nylon (PA6/66) | Wear and heat resistance for mechanisms | Absorbs moisture; dimensions move |
Glass-filled grades | Stiffness and dimensional stability | Abrasive; pushes you to hardened tooling |
DFM rules that keep molded parts out of trouble
- Uniform wall thickness. Target 1.5-3.0 mm for most thermoplastics and keep it constant. Thickness changes cause sink and warp.
- Draft every vertical face. 1 degree minimum, 3 degrees or more on textured surfaces, or parts drag on ejection.
- Rib rules. Ribs at 50-60% of nominal wall, height under 3x wall, with a radius at the base.
- Radius sharp corners. Internal radius of at least 0.5x wall reduces stress concentration and improves flow.
- Design out undercuts. Every side action or lifter adds tooling cost and cycle time. Pass-through windows are often free.
- Place the gate deliberately. Gate location decides weld line position, cosmetic marks and fill balance.
- Call tolerances only where they matter. Blanket tight tolerances on a molded part inflate the quote with no functional gain.
Common molding defects and their usual cause
Defect | Usual cause | First fix to try |
|---|---|---|
Sink marks | Thick sections, low pack pressure | Core out the boss; raise hold pressure |
Warp | Uneven cooling or non-uniform walls | Balance cooling lines; equalize wall thickness |
Short shot | Inadequate fill pressure or vent | Add venting; raise melt temperature |
Flash | Insufficient clamp or worn parting line | Increase tonnage; re-spot the tool |
Weld lines | Flow fronts meeting cold | Move the gate; raise mold temperature |
Burn marks | Trapped air compressing at fill end | Add vents; slow injection at the end of fill |
From first article to production
- T1 samples. First shots off the new tool. Expect to find fit and cosmetic issues here — that is what T1 is for.
- Tool adjustments. Steel-safe changes (adding material to the part, removing steel) are cheap; the reverse means welding or inserts.
- First article inspection. Dimensional report against the drawing, signed before production.
- Process validation. For regulated products, IQ/OQ/PQ on the press and the tool.
- Production release. Locked process sheet: temperatures, pressures, cycle time, resin lot and drying spec.
If you are choosing between molding, casting and printing for a product still in development, our team runs the DFM review and the tooling quote together so the two decisions are made with the same numbers. See low-volume manufacturing and design for manufacturing, or talk to an engineer.
Choosing between injection molding and its alternatives
Injection molding is the right answer at volume and the wrong answer before it. The break-even is set by tooling amortization: a $22,000 aluminum tool spread over 500 parts adds $44 per part, over 25,000 parts it adds $0.88. Run the arithmetic against your real first-year forecast, not the forecast in the pitch deck.
Process | Tooling cost | Per-part cost | Economic range | Lead time to first parts |
|---|---|---|---|---|
3D printing (SLA/SLS) | $0 | $8–$120 | 1–200 units | 2–7 days |
Urethane casting | $1k–$5k | $25–$180 | 20–500 units | 1–3 weeks |
Bridge / aluminum tooling | $4k–$20k | $1.50–$12 | 500–25,000 units | 2–4 weeks |
Production steel tooling | $18k–$120k | $0.40–$6 | 25,000+ units | 8–16 weeks |
Multi-cavity hardened tool | $60k–$300k | $0.15–$3 | 250,000+ units | 12–20 weeks |
What drives tooling price
- Cavity count: a four-cavity tool is not 4x a single-cavity tool, but it is typically 2.5–3x, and it quarters cycle cost per part.
- Side actions and lifters: every undercut adds $1,500–$8,000 and a new failure point; redesign the undercut before paying for the slide.
- Steel grade: P20 for hundreds of thousands of shots, H13 or S7 for abrasive glass-filled resins, stainless for medical and wet environments.
- Surface finish: SPI A-2 polish and chemical textures (MT-11010 and similar) add cost and constrain minimum draft.
- Part size and shot weight: tonnage requirement scales with projected area, and press rate follows tonnage.
- Tolerance callouts: asking for ±0.05 mm where ±0.20 mm would work can add weeks of tool tuning.
Design-for-molding checklist
- Uniform nominal wall, usually 1.5–3.0 mm for most thermoplastics; core out thick sections rather than leaving mass.
- Draft of 1° per side minimum, 3°+ on textured faces, more on deep ribs.
- Ribs at 40–60% of the nominal wall to avoid sink marks on the show surface.
- Generous internal radii — sharp inside corners concentrate stress and are hard to polish.
- Agree gate and ejector-pin locations with the molder before CAD is released, not after.
- Specify the resin by grade and supplier, not by family; 'ABS' is not a specification.
The molding schedule nobody budgets for
First article parts are not production parts. Expect T1 samples, a dimensional report, one or two tool revisions, then a short process validation run before you can ship.
Realistic timeline from tool kickoff to sellable parts is 12–20 weeks for a steel tool, and adding material or texture changes mid-build resets a large part of that. Steel-safe design — leaving material to be removed later — is the standard hedge, because adding steel back to a cut tool means welding or an insert.
If you are deciding between bridge tooling and full production steel, our prototyping and consulting teams model both against your forecast before anyone cuts metal.
What a molding partnership actually buys you
Announcing a partnership is easy. Making one pay off in injection plastic molding means agreeing, in writing, on who owns the tool, who owns the process window, and who eats the cost when a dimension drifts. The three questions below settle most of it before the first steel is cut.
Decision | Who should own it | Why it matters | Typical contract language |
|---|---|---|---|
Tool ownership | Brand (customer) | Lets you move the mold if the molder underperforms | "Customer-owned tooling, released on 10 days notice" |
Process window | Molder | They run the press and carry scrap risk | "Molder maintains validated process per IQ/OQ/PQ" |
Dimensional acceptance | Shared, per drawing | Prevents endless argument at first article | "CpK 1.33 on critical-to-function dimensions" |
Tool maintenance | Molder, billed at cost | Preventive cleaning at set shot counts | "PM every 100,000 shots, log provided" |
Engineering changes | Brand approves, molder quotes | Change cost explodes after texture | "ECO quote within 5 business days" |
Cost of change by program stage
The same geometry edit costs an order of magnitude more depending on when you ask for it. This is the single largest avoidable expense in a molding program.
Stage | Typical change cost | Schedule hit | Notes |
|---|---|---|---|
CAD, before tool kickoff | $0-$2,500 | 0-3 days | Free if caught in DFM review |
Tool in cut | $1,500-$8,000 | 1-2 weeks | Depends on which plate is affected |
After T1 samples | $3,000-$15,000 | 2-4 weeks | Steel-safe changes are cheapest |
After texture | $8,000-$30,000 | 4-8 weeks | Texture must be stripped and reapplied |
After PPAP / production | $15,000-$60,000+ | 6-12 weeks | May require a second tool to keep supply running |
Qualification checklist before first production run
- Tool book delivered — steel certs, cooling layout, ejector map, spare inserts list.
- Process sheet locked — barrel profile, fill/pack/hold, cooling time, cycle time.
- First article inspection — every dimension on the print, not just the ones the molder likes.
- Capability study — 30-part study with CpK on critical dimensions.
- Material certification — resin lot traceability and regrind policy in writing.
- Packaging validated — parts must survive the trip, not just the press.
A partnership that produces those six artifacts is real. One that produces a press release is not. If you are evaluating molders, our design for manufacturing review catches the geometry problems before they become tooling invoices.
Frequently asked questions
How much does injection plastic molding cost?
Cost splits in two. Tooling runs about $3,000-$12,000 for an aluminum bridge mold and $12,000-$80,000 for a production steel mold, depending on cavitation, side actions and finish. Piece price for a typical palm-sized part is usually $0.20-$2.00, driven by resin weight, cycle time and cavity count.
What is the minimum volume that justifies a mold?
Break-even is usually somewhere between 500 and 2,000 parts against 3D printing or urethane casting. Divide the tooling cost by the per-part savings versus the alternative process; if the answer is more parts than you will sell in two years, use a bridge tool instead.
How long does it take to get a mold built?
Aluminum bridge tools typically take 2-4 weeks to first shots. Production steel tools take 6-12 weeks, plus 1-3 weeks of tuning after T1 samples. Add time if the part still needs DFM changes when the tool is quoted.
What wall thickness should a molded part have?
Most thermoplastics mold well between 1.5 mm and 3.0 mm, held uniform across the part. Thicker sections increase cooling time (which scales with the square of thickness) and cause sink and voids; thinner sections risk short shots unless flow length is short.
Who owns the mold?
If you paid for it, your contract should say you own it and can move it to another molder. Get tool ownership, storage responsibility, maintenance intervals and transfer terms in writing before the purchase order — retrieving an unowned tool later is slow and expensive. Work with LA NPDT: if you are moving from here to execution, start with our our product development process or talk to us about end-to-end product development .
Related articles
All articles
Injection Molding Tooling Cost: Molds, Part Price and Break-Even
Injection molding tooling cost by mold class and cavitation, how it amortizes into part price, and where the break-even against machining and printing sits.
Mold Flow Analysis: How It Cuts Injection Molding Cost
Injection molding cost is decided by tool steel, cavity count, geometry, resin and tolerances long before the first shot. Here is what each lever is worth and which savings are safe.
Compression Molding vs Injection Molding: Which to Use, and When
The two processes differ most in what they cost you before the first good part. Here is how to choose, illustrated by a silicone product that went to market on compression molds.
Services related to this guide
- Free trademark searchScreen a product name against the live USPTO register in seconds.
- Idea evaluationAn honest read on whether an idea is worth building.
- Product design servicesIndustrial design and CAD taken all the way to manufacturable files.
- Product development examplesReal projects we designed, prototyped and shipped.