Pet Product Design: How Scratch Square Was Designed and Made
A pet product has to survive teeth, claws and a dishwasher, and still be cheap enough to sell. Here is how the Scratch Square dog toy was designed, tooled and launched.
August 22, 202611 min read

Written by Konstantin Dolgan, Ph.D., NPDP
Founder & CEO, Product Development Engineer
Published August 22, 2026
Pet product design is industrial design under animal load: the product is used by an animal that chews, claws and drools on it, bought by a human who cares about looks and price, and sold at a retail price that leaves very little room in the bill of materials. The design work is mostly about surviving all three at once. The clearest way to show what that means is to walk through one product we designed and took to production.

The product: a toy that files a dog's nails
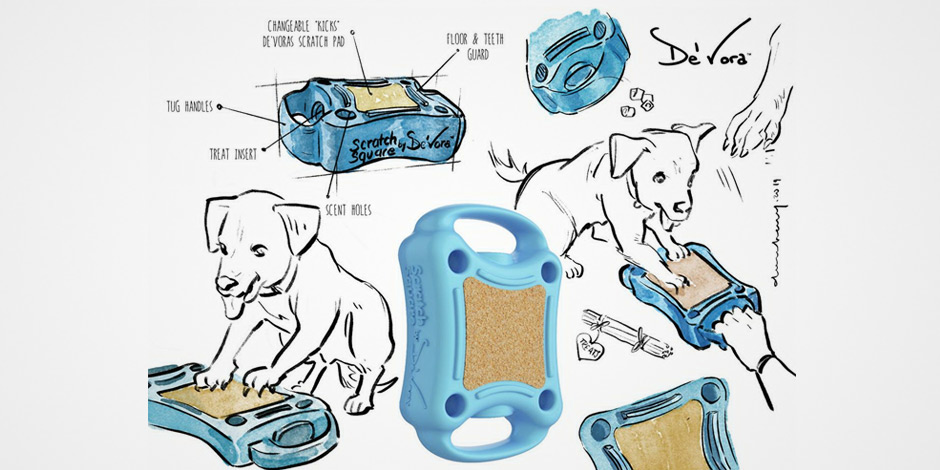
De'Vora, a pet products company, came to us with Scratch Square - a multi-functional toy that combines a treat dispenser with abrasive surfaces, so a dog naturally files its own nails while playing with it. The concept was sound and the client had a clear picture of the product. What they needed was to get it made: a design that could be moulded and assembled at a price that worked, and tooling that a first-time brand could afford.
Scratch Square went on to become a bestseller, sold through Amazon, Chewy, QVC, Walmart and Tractor Supply, and the line has since expanded into different sizes, replacement pads and a cat version.
What makes pet products harder than they look
Constraint | Why it bites | What it forces in the design |
|---|---|---|
The user is an animal | No instructions, no care, full body weight and teeth | No small removable parts, no pinch points, no brittle sections |
The buyer is a human | Bought on shelf appeal and story | Colour, form and packaging matter as much as function |
Retail price ceiling | Pet aisle prices are set by category, not by your costs | Bill of materials and tooling must be designed down from day one |
Cleaning and saliva | Products get chewed, soaked and washed | Material choice, sealed assemblies, no absorbent joints |
Safety expectations | Choking, ingestion and abrasion risks | Wall thickness, part retention, tested materials |
The hard part: a complex rubber shape and one very awkward mould
Scratch Square is made of several components - a rubber enclosure and internals. The rubber part had a complex shape of the kind that would normally be split into several separate pieces, or made in one piece with an expensive multi-action mould. Either route adds cost: more parts means more assembly, and a complicated tool means a bigger cheque before the first unit is sold.
The real obstacle was buried inside the geometry. The main cavity that forms the internal compartments needs an inner core, and that core has to come out after moulding. On Scratch Square, the side handles blocked access from the sides, so the obvious removal directions were unavailable. A part you cannot get out of the tool is not a manufacturable part, no matter how well it performs.

How we solved it
- Designed the moulds for the original version of the toy first, so the problems were visible in tooling terms rather than argued about in the abstract.
- Ran a manufacturability pass over that design and marked every area that would cause trouble in production, then modified the geometry to remove those areas.
- Made small design changes purely to help manufacturing and assembly - the kind of edits an end user never notices and a tooling quote notices immediately.
- Worked directly with the manufacturer on the core-removal problem and developed a creative forming and extraction process that got the part out of the mould without adding tool actions.
- Simplified the moulds as a result, which is where the tooling saving actually came from.
That last point is the one worth repeating. The saving did not come from re-quoting the supplier. It came from changing the part so that a simpler tool could make it. Unit cost and tooling cost are decided in CAD, not in negotiation.
The result
Optimising the design for manufacturing and assembly and simplifying the moulds let De'Vora produce the first batch of Scratch Square with minimum upfront investment. That meant they could launch on a budget and test the market quickly, with the risk kept small - which is exactly what a new pet brand needs before it commits to volume. The market answered: the product is now stocked by the major pet retailers and has grown into a product line.
What to take from this if you are designing a pet product
If your product... | Do this before you quote tooling |
|---|---|
Has handles, undercuts or hollow internals | Have a tooling engineer mark the mould directions early - blocked cores are the classic pet-toy trap |
Is made of several moulded parts | Ask whether two parts can become one, and whether any fastener can become a snap fit |
Is chewed or clawed | Choose materials for tear strength and abrasion, not just hardness |
Has to hit a shelf price | Model the bill of materials at your target volume before finalising the form |
Is a first product for the brand | Design so the first tool is cheap and simple; buy the fancy tool once demand is proven |
Frequently asked questions
What pet products have to survive that human products do not
A pet product has two users with opposite interests. The animal chews, drags, claws and swallows; the owner buys, cleans, stores and replaces it. Almost every design failure we see in this category comes from optimising for the buyer and forgetting the animal, or from making something the animal loves that no owner would put in a living room.
Requirement | Why it breaks products | Design response |
|---|---|---|
Chew and claw loads | Point loads far above human handling; thin edges become failure points | Thicker sections at edges, no exposed thin ribs, no glued seams in reach |
Ingestion safety | Small detachable parts are a vet visit | No parts smaller than the animal's mouth; captive or moulded-in features only |
Cleaning | Food residue in blind pockets ruins repeat purchase | Open geometry, draft that lets residue fall out, dishwasher-safe material choice |
Material safety | Owners read the packaging closely | Food-contact grade polymers, documented supplier certificates |
Retail shelf | Buyers judge in three seconds through a hang-hole card | Silhouette readable from the front, colour that survives store lighting |
What developing a product like this typically costs
Ranges below are what a moulded consumer pet product of this complexity usually takes, assuming one part family and no electronics. They are planning figures, not a quote - the honest driver of the total is how many times the geometry changes after tooling is cut.
Stage | What you get | Typical cost | Typical time |
|---|---|---|---|
Concept and industrial design | Sketches, form direction, chosen concept | $3k - $9k | 2 - 4 weeks |
Engineering and CAD | Production-intent 3D model, part breakdown | $6k - $18k | 3 - 6 weeks |
Prototypes | Printed and finished parts for fit and user testing | $1.5k - $6k | 1 - 3 weeks |
Design for manufacturing | Draft, wall thickness, mould-flow and ejection review | $3k - $8k | 1 - 3 weeks |
Tooling | Steel or aluminium mould, first shots | $8k - $35k per tool | 6 - 12 weeks |
Checklist: before you commit to a mould
- Every external surface has draft, and you know which face carries the parting line.
- The core can be pulled without a side action, or you have priced the side action.
- Wall thickness is uniform enough that you are not designing in sink marks.
- Part count is the minimum that still assembles - each extra part is another tool.
- The animal has physically handled a printed part, not just a rendering.
- Material has documented food-contact compliance from the actual supplier.
- Packaging geometry is fixed, because it changes the product's outer dimensions.
Choosing a manufacturer for a pet product
The moulder you pick shapes the design as much as the designer does. Pet products sit awkwardly between toys and housewares, so a factory that has only made one of those will apply the wrong instincts - toy factories over-engineer safety features that add cost, housewares factories under-estimate chew loads. Ask for parts they have made in the same material and the same wall thickness, not a general catalogue.
Question | A good answer sounds like | A warning sign |
|---|---|---|
Have you moulded this material before? | Names the grade and the supplier | Says any polymer is fine |
Who owns the tool? | You own it, and it can be moved | Tool stays with them, no drawings |
What is your DFM feedback on this file? | A marked-up list of specific concerns | No comments at all |
What is the first-article process? | Dimensional report against your drawing | We will send you some samples |
What happens if the tool needs a change? | Quoted rates for common modifications | We will look at it then |
Five mistakes we see in pet product briefs
- Designing for the photograph. A form that renders beautifully often has thin edges an animal removes in a week.
- Treating cleaning as a detail. Any cavity that traps food becomes the reason the product is not repurchased.
- Skipping animal testing. Owners give polite feedback; animals do not, and only the animal reveals failure modes.
- One size for all breeds. A product sized for a mid-size dog is a hazard for a small one and a toy for a large one.
- Locking packaging last. Hang-tab, carton and shelf constraints routinely force late changes to the product itself.
Where the money goes wrong on a pet product
Budget damage in this category is rarely one large mistake. It is a sequence of small deferrals, each of which looks reasonable at the time and each of which lands on the tooling invoice. The table sets out the ones we see most often and what each costs to fix at the point it is normally discovered.
Issue | Cost if caught in CAD | Cost if caught after tooling |
|---|---|---|
Undercut requiring a side action | Free - redraw the feature | $3k - $9k tool rework |
Wall thickness causing sink marks | Free | $2k - $6k plus re-shots |
Part too large for the retail carton | Free | New packaging plus possible tool change |
Material swapped for compliance | Hours of engineering | Shrinkage changes - tool may need re-cutting |
Adding a second size | Days of engineering | A second tool at full price |
How to phase the spend if your budget is tight
Founders funding a first product themselves do not need to commit the whole programme at once. Phasing it into three fundable chunks keeps the option to stop cheaply, and each chunk produces something you can show to an investor or a retailer.
- Phase one - concept, one printed prototype and a costed bill of materials. Enough to test the idea on real animals and to talk to buyers.
- Phase two - production-intent engineering, DFM review and a moulder quote. Enough to know the real unit cost before any tooling money moves.
- Phase three - tooling, first articles and the first production run. Only started once the design is frozen and the price works.
What to measure after the product ships
The design work does not end at the first production run. Pet products generate unusually honest feedback - the animal either uses it or ignores it - and the first six months of returns, reviews and replacement requests tell you exactly which decision to revisit in version two. Set up the measurement before launch, because retrospective data is guesswork.
Signal | What it usually means | Design response |
|---|---|---|
Returns citing durability | A section or edge is too thin for the load | Thicken the failing area; consider a tougher grade |
Reviews mentioning cleaning | A pocket or seam traps residue | Open the geometry or change the parting line |
Low repeat purchase | Product works but is not loved | Revisit the animal's interaction, not the styling |
Size complaints | One size is serving two breeds badly | Add a size before adding features |
Damage in transit | Packaging protects the shelf, not the product | Revise the insert or carton, not the part |
Sustainability choices that are worth making
Pet owners increasingly read the material claim, and most of the meaningful improvements in this category cost little if they are decided early. Recycled content in the packaging, a single-polymer product that can actually be recycled, and a replaceable wear part instead of a disposable product are all easier to design in than to retrofit. Claims must be evidenced by supplier documentation - unsupported wording is a legal risk, not a marketing benefit.
- Design in one polymer family where possible, so the product is recyclable in practice.
- Make the wear part replaceable, and sell the replacement.
- Specify recycled content in packaging, where certification is straightforward.
- Avoid glued dissimilar materials that cannot be separated at end of life.
- Keep every environmental claim tied to a document you actually hold.
Terms your moulder will use
Most of the friction in a first tooling conversation is vocabulary. These are the words that come up in every DFM review of a moulded pet product, in plain language.
Term | What it means | Why it matters to you |
|---|---|---|
Draft | A slight taper on vertical faces | Without it the part will not release from the mould |
Parting line | Where the two halves of the mould meet | It will be visible on the finished product |
Side action | A moving part of the tool that forms an undercut | Adds thousands to the tool and time to each cycle |
Sink mark | A dimple over a thick section | Cosmetic defect caused by uneven wall thickness |
Ejector pin | Pushes the part out of the mould | Leaves small circular witness marks |
First article | The first parts off the new tool | Your chance to check the tool against the drawing |
If you are starting your own pet product
The sequence below is the shortest honest route from an idea to something you can sell, and it is the order we would run it in. Each step produces a decision, not a document.
- Write down the animal behaviour you are designing for, and the owner problem you are solving. If those two conflict, resolve it now.
- Search the market and the patent landscape before you love the idea.
- Sketch three genuinely different directions and choose one on evidence.
- Print one and put it in front of an animal for a week.
- Engineer it properly, with a moulder involved while the CAD is still editable.
- Freeze it, tool it, and spend the tooling lead time on packaging and listings.
If you would rather not run that alone, our discovery and prototype engagement covers the first four steps, and the prototype cost calculator gives a figure for your own specification in a couple of minutes.
Frequently asked questions
How much does it cost to make a prototype of a pet product?
A printed and finished appearance prototype is usually $300 - $1,500 for a single part; a functional version in a representative material, made by casting or machining, runs $800 - $4,000. The variables are size, finish and how many iterations you build before you are satisfied - the material itself is rarely the expensive part.
Can I design a pet product myself and only outsource engineering?
Yes, and it is a sensible way to control cost if you have a clear form idea. What you are buying is the production-intent engineering: wall sections, draft, part breakdown, material specification and the drawing package a factory can quote. Bring your concept as sketches or a rough model plus the constraints you know, and expect the geometry to change once manufacturing reality is applied to it.
How do I protect a pet product design from copies?
Design patents on the visual form, utility protection on any genuine mechanism, and a registered trademark on the brand are the three legal layers, and none of them stops a determined copyist alone. The practical defences are commercial: own your tool, hold the supplier relationship, keep improving the product, and build a brand customers ask for by name. Start with a prior art search so you know what is already claimed.
Should I sell direct or through retail first?
Direct first, in most cases. It gives you margin, customer contact and honest early feedback at a volume you can actually supply, and it produces the review count and sell-through data that retail buyers ask for anyway. Retail is the right second step once the product is proven, because it demands packaging, case packs, lead times and terms that are expensive to get wrong on a first version.
Can I make a pet product without injection molding?
For a first few hundred units, yes. Cast urethane and silicone parts, CNC-machined components and sewn or extruded constructions all reach a small market without a steel tool. They cost more per unit and finish less consistently, but they let you sell, gather reviews and prove demand before spending on a mould - see low-volume manufacturing for how those runs work.
What safety standards apply to pet products?
Pet products are not regulated as strictly as children's products in the US, which does not mean the risk is lower - it shifts liability onto you.
Retailers usually impose their own requirements, and the practical baseline is food-contact grade materials with supplier documentation, no small detachable parts, and a documented reason for every material choice.
Confirm the specific requirements with your intended retailer before tooling, because their list is the one that decides whether you can sell.
What material is best for a chew-resistant pet product?
There is no single answer, but the shortlist is narrow: reinforced nylon and TPE for durability with some give, food-contact grade polypropylene for rigid low-cost parts, and platinum-cure silicone where softness matters.
What decides it is the failure mode you are designing against - abrasion, tearing or cracking each favour a different family. Confirm the grade with your moulder before the geometry is frozen, because wall thickness has to be tuned to the material.
How many prototypes do I need before tooling a pet product?
Three rounds is typical: one to check size and form in the hand and the home, one for the animal to actually use, and one made in a material close to production so the failure mode is realistic. Printed parts flatter a design - they are stiffer and rougher than moulded ones - so the last round should be cast or machined in something representative.
How long does it take to bring a pet product to market?
Nine to fifteen months is realistic from first sketch to product on a retail shelf. Design and engineering take three to five months, tooling six to twelve weeks after the geometry is frozen, and the retail side - packaging, certifications, listings and purchase orders - usually adds another quarter that founders forget to plan for. See how long prototyping takes for the earlier part of that timeline.
Do I need a patent before designing a pet product?
Not before design, but search prior art early so you do not engineer around a feature you cannot own. Many pet products are protected by design patents covering the form rather than utility patents covering the function, so the shape you settle on has commercial consequences.
Services related to this guide
- Product design servicesIndustrial design and CAD taken all the way to manufacturable files.
- Best industrial design firmsWhich studios take an idea from form to manufacturable hardware, and what they charge.
- Prototype designLooks-like, works-like or pre-production: what each proves and what it costs.
- Product development examplesReal projects we designed, prototyped and shipped.